
Tomcat 之 Servlet 型内存马
Java 内存马系列-05-Tomcat 之 Servlet 型内存马
0x01 前言
感觉 Servlet 内存马这块是千人千语吧,难度实在是不小,光是不同 Tomcat 获取 Context 就需要不少,而且 Servlet 还有动态注册一说,难度还是蛮大的。
- 本文还是从流程 ————> 分析 ————> PoC 这一角度来看内存马
0x02 Servlet 创建
早在我最前面的一篇,关于 Java 内存马的基础文章里面提到过 Servlet,在我眼里它是半个中间件。流程是 init() —-> doXXX —-> destory()
这里我们可以先看一下 Servlet 这个接口有哪些方法
Servlet 接口分别有如下几个方法:
1 | public interface Servlet { |
从 Servlet 接口里面我们可以看得出来,如果我们要写恶意代码,应该是写在 service() 方法里面,所以这里我们直接创建一个恶意的 Servlet,代码如下。
1 | package tomcatShell.Servlet; |
并且配置 web.xml,这里最好配一下,如果不配后续的分析会比较难。
测试一下,成功!
0x03 Servlet 流程分析
前情剧透:Servlet 的流程分析比 Filter 和 Listener 复杂一些
因为 Web 应用程序的顺序是 Listener —-> Filter —-> Servlet,所以我们在调用 Servlet 的时候也会看到之前的 Listener 与 Filter 的流程。
- 如图,这里我先把断点下在了
service()方法,我们可以看到这个地方是有 Filter 的流程的。
正式开始分析,我们把断点下在
init()方法这里。
获取到 HTTP 请求
这里我们肯定还要回去,从前面开始分析。也就是把断点下到 HTTP11Processor 类的 service() 方法,重新开始调试。
这个 HTTP11Processor 类是一个网络请求的类,它的作用是处理数据包,而它的 service() 方法主要是在处理 HTTP 包的请求头,主要做了赋值的工作,后续会通过 ByteBuff 进行数据解析。
所以这一块并不是很重要,都是一些基础的赋值,我们继续往下走,直接到 343 行这里
1 | this.getAdapter().service(this.request, this.response); |
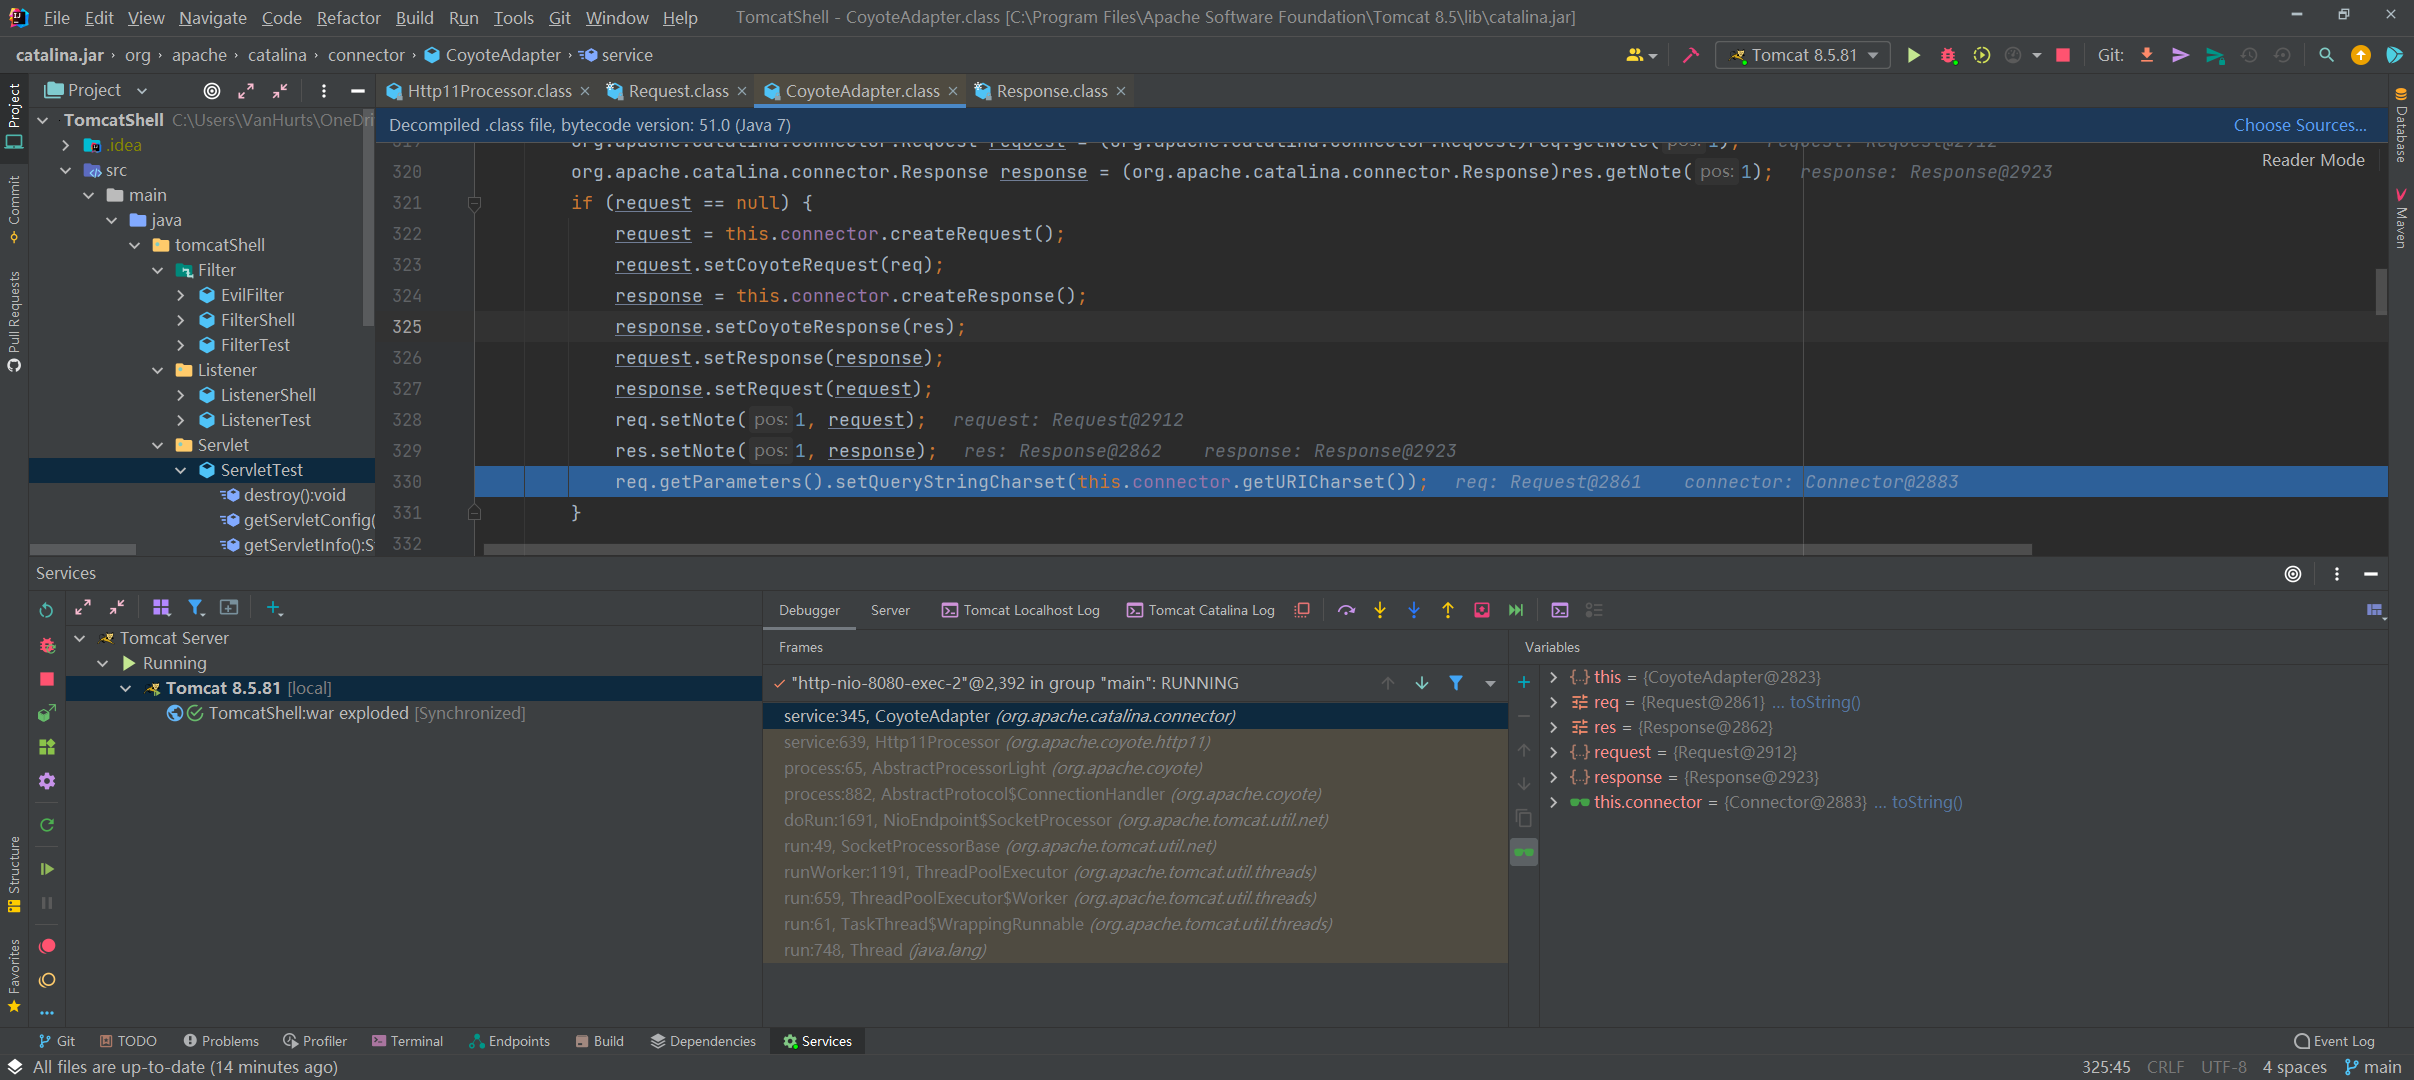
跟进,我们去到的是 CototeAdapter 类的 service() 方法里, CoyoteAdapter 是 Processor 和 Valve 之间的适配器。
首先我们关注传参,传入的参数是 org.apache.coyote.Request 和 org.apache.coyote.Response 类型的对象,后面又进行了 getNote() 方法的调用。
- 对应的
getNote()方法
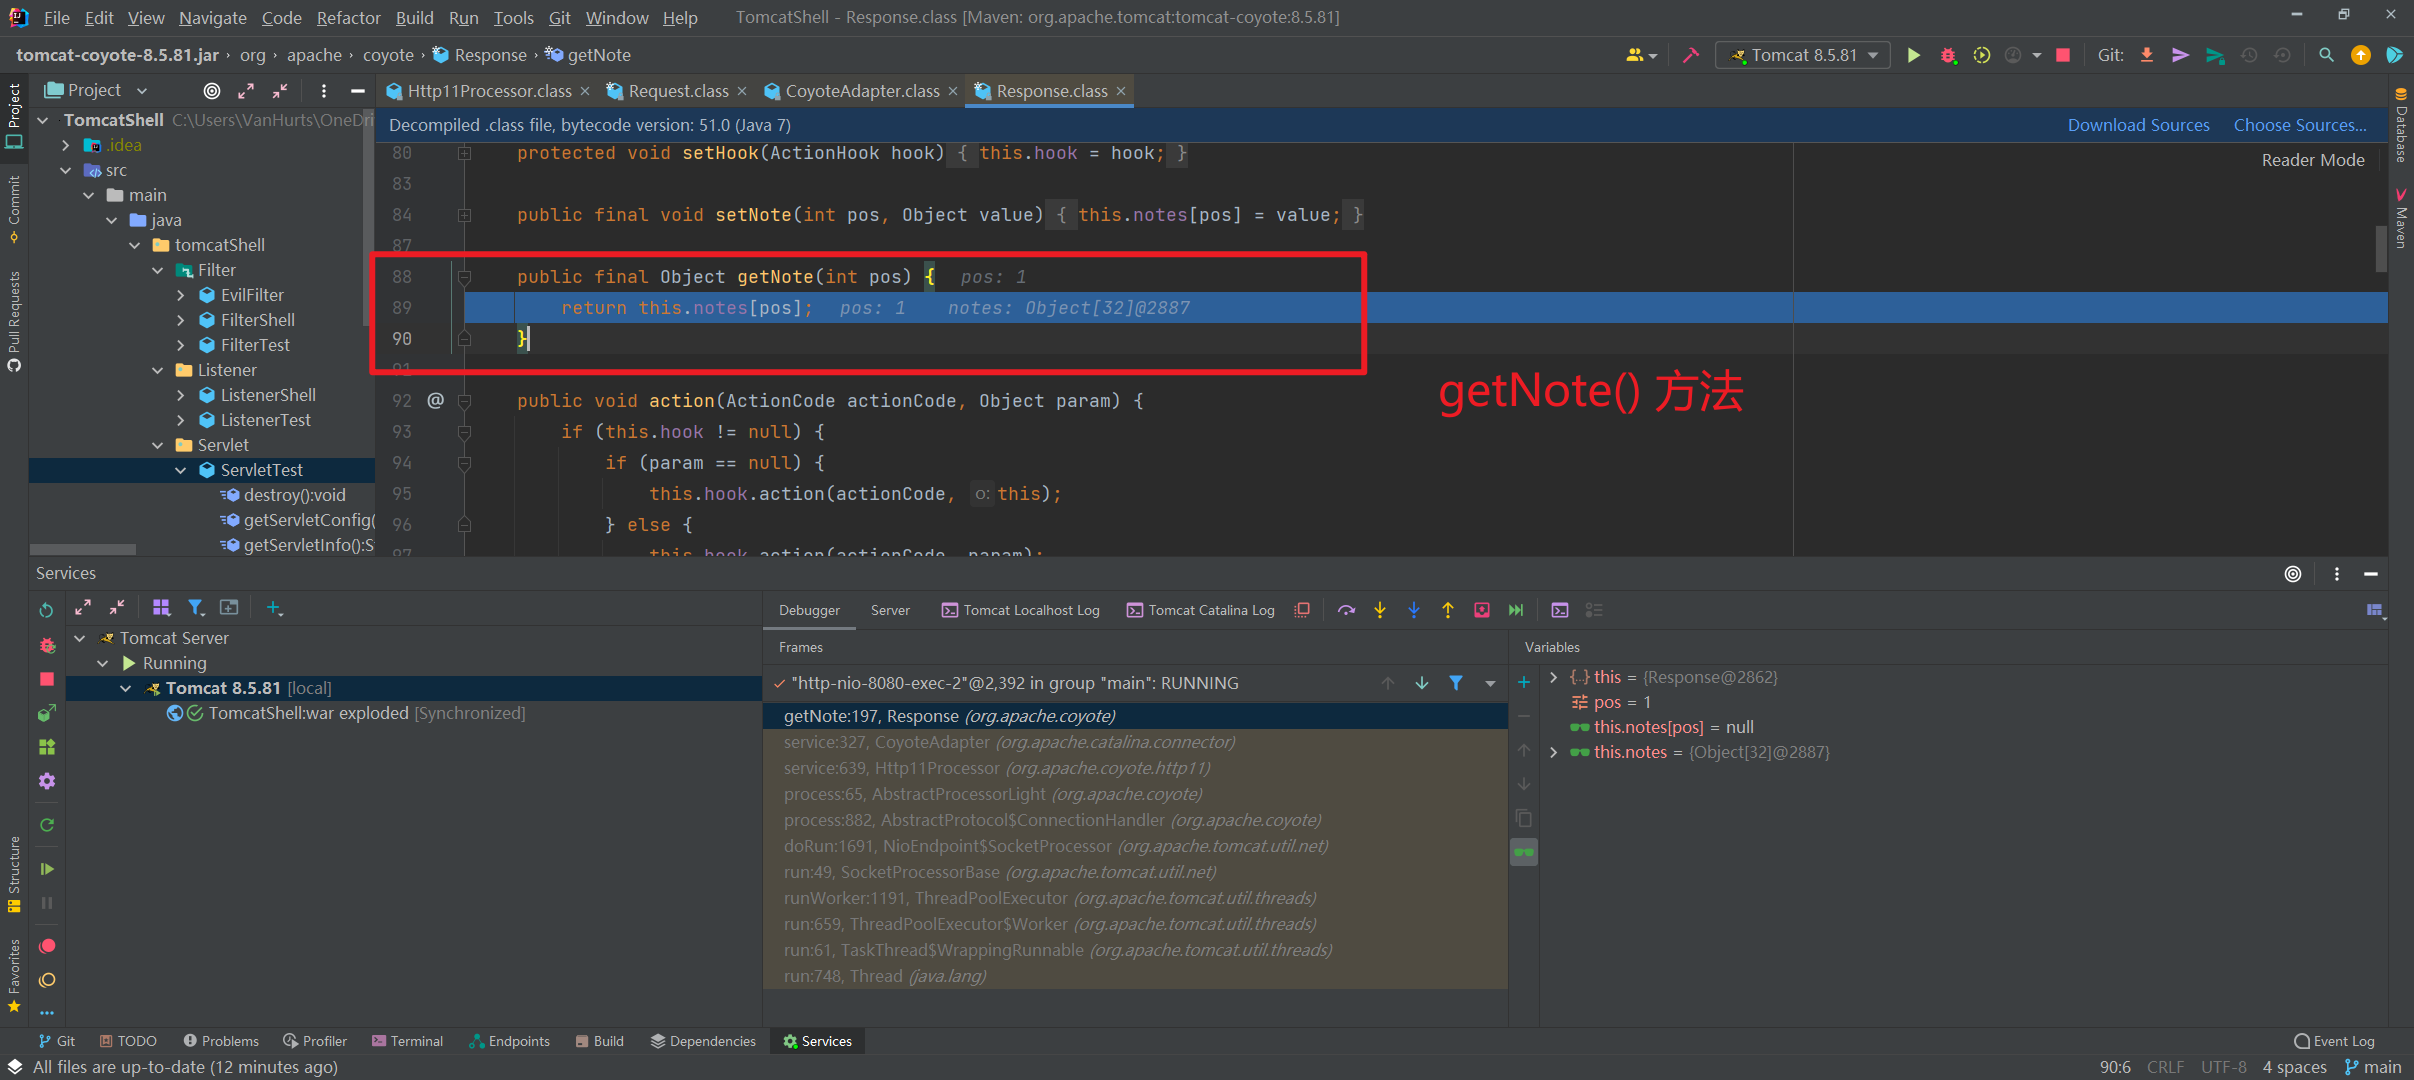
这两个 getNote() 方法都是取 notes 数组里指定 pos 的对象,也就是去 notes[1] 的这个对象,note[1] 的的值是在 CoyoteAdapter#service 里设值的。
我们继续往下看,如果 request == null,进行一系列的赋值。
后续也都是一些基础的赋值啥的,直到 353 行这里
1 | this.connector.getService().getContainer().getPipeline().getFirst().invoke(request, response); |
这一行是 service() 方法里最关键的步骤了
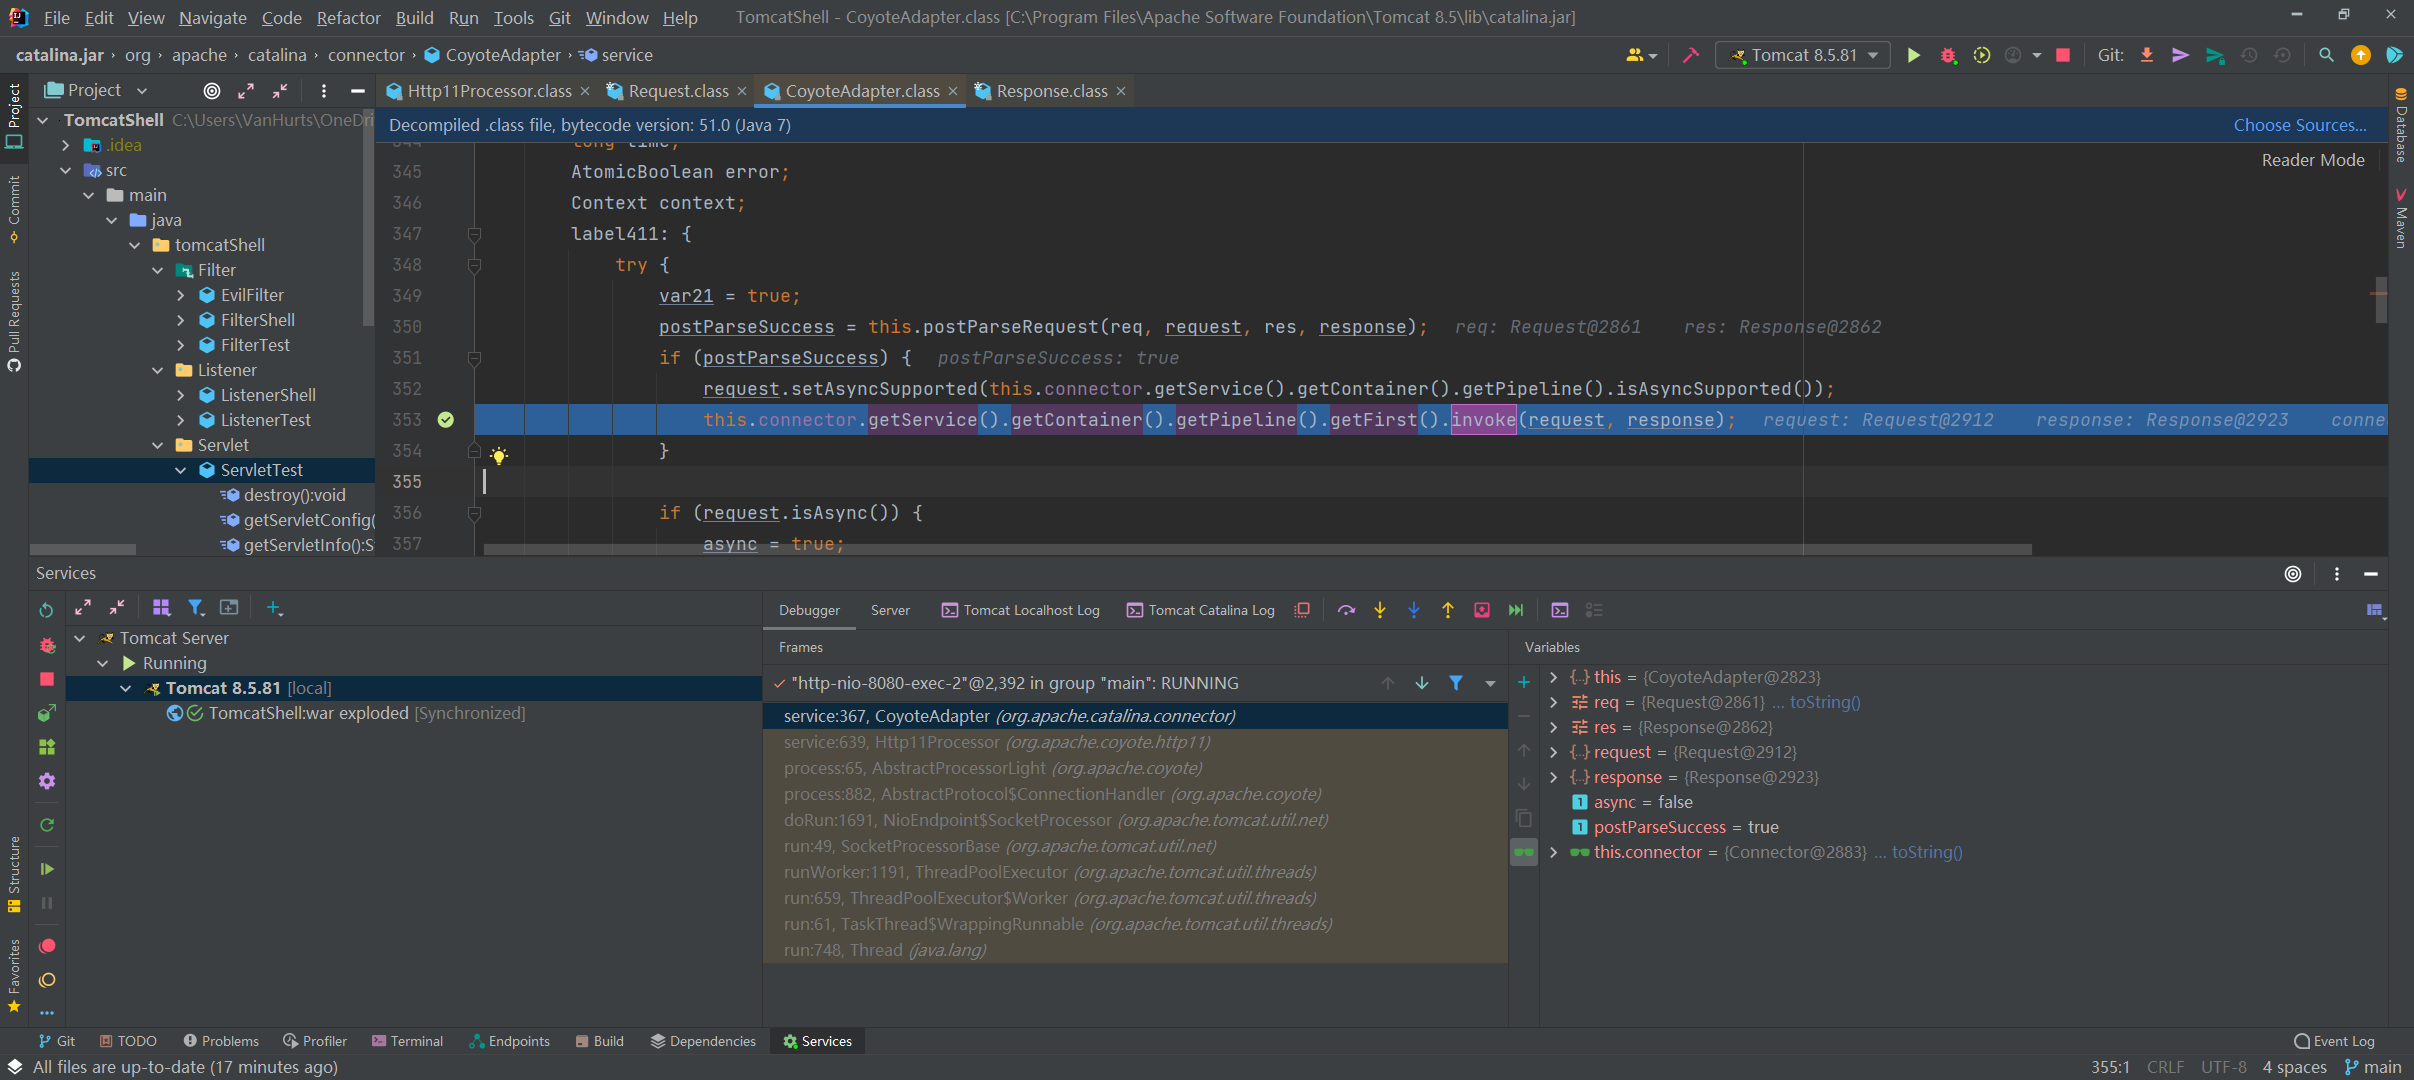
比较复杂,我们要逐个分析,首先是变量名 connector,它里面存了我们一整个的 HTTP 包。
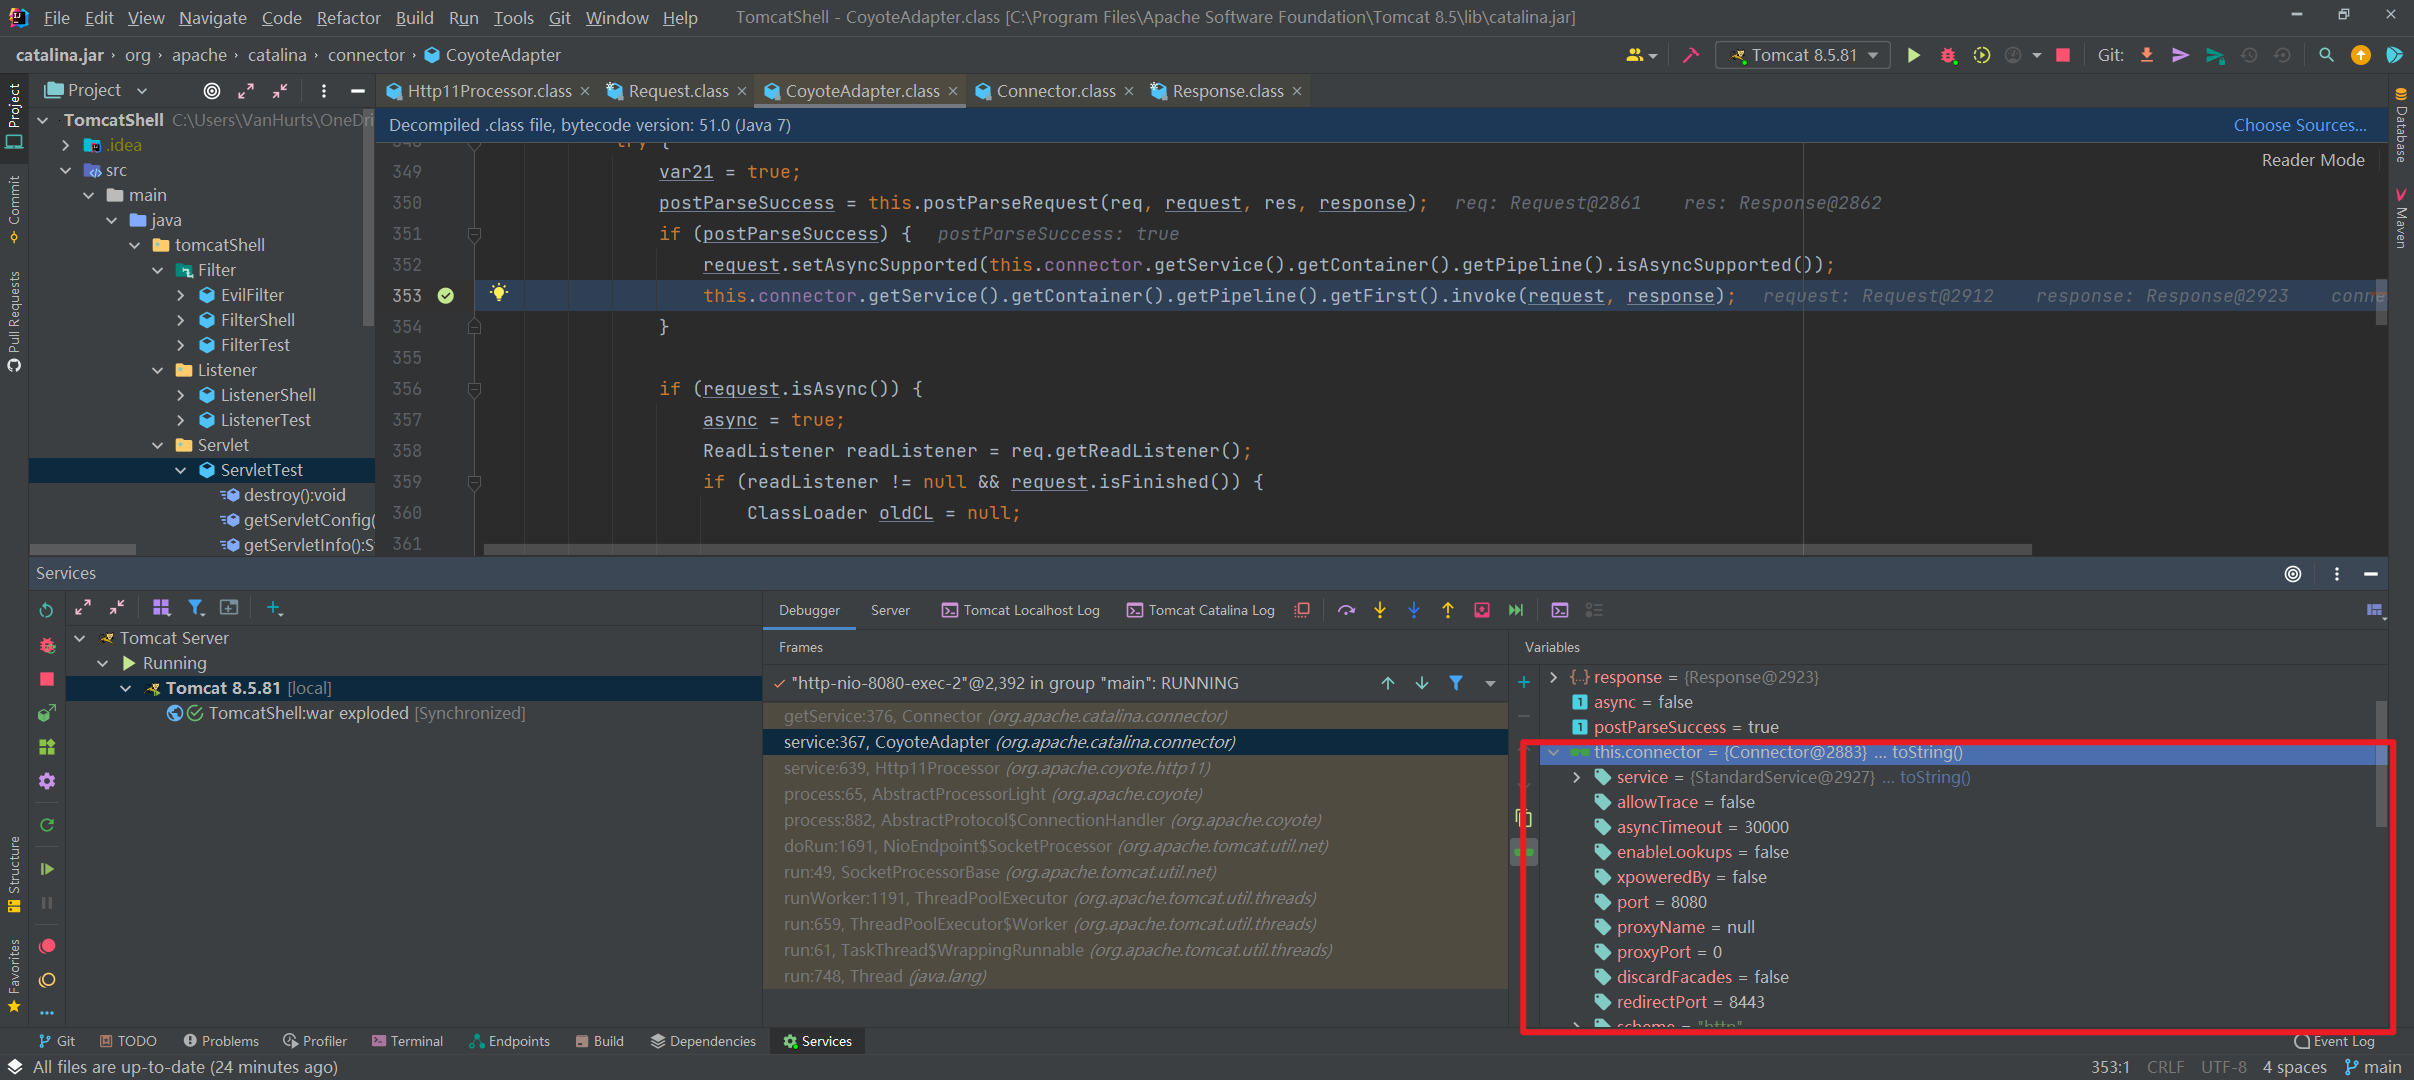
这里师傅们可以逐个点进去看一下
connector.getService() 返回的是 Connector 关联的 Service 属性,也就是 StandardService 类型的对象。
connector.getService().getContainer() 返回的是 Service 里的容器 Engine 属性,也就是 StandardEngine 对象。
connector.getService().getContainer().getPipeline() 返回的是 StandardEngine 里的 Pipeline 属性,也就是 StandardPipeline 对象。

返回的是 StandardPipeline 的 Valve 类型的数行 first 或者 basic

这里感觉获取不到什么有用的信息,所以直接跳进 invoke() 方法, StandardEngineValve#inovke() 进行了 host 相关的简单判断。再继续往下,host 是 Tomcat 内置的 host。
后续的内容就和 Filter 很类似,也就是多个 invoke 的调用,综上,这其实是一个获取到 HTTP 请求,进行预处理的过程。
读取 web.xml
这里的断点位置是 ContextConfig#webConfig(),读取 web.xml 的流程与 Listener 型内存马里面基本类似,但是还是有点不同。
- 断点位置如图
开始调试,首先我们获取到了此项目里面的 web.xml 文件
中间内容是处理 Filter,Listener 等信息的代码,所以这里我们直接跳过,到 1115 行的 configureContext(webXml); 中去
跟进,我们看到 configureContext() 方法也是先获取 Listener,Filter,还有 localeEncodingMappings 等,继续往下走,直到 1281 行这里,开始进行 Servlet 的读取。
创建与装载 StandardWrapper
1282 行的语句,createWrapper(),实际上就是创建了 StandardWrpper,后续代码会对它进行加载与处理。
继续往下走,这里很明显,我们将所有的 servlets 保存到了 Wrapper 里面,如图。后面代码做的很大一部分工作都是在把 web.xml 里面的数据写到 StandardWrapper 里面
我们继续往下看,后续都是一些添加的操作了,这里我们先跳过了。继续往下看,1334 行,将 Wrapper 添加到 context 中,这里对应的是 StandardContext。
后续把 web.xml 中的内容装载进了 StandardWrapper 中。也就是 StandardWrapper 的装载
- 那么这里我们就应该思考了,Wrapper 里面包含了我们的恶意 Servlet 内存马,那 Wrapper 最后是放到哪里去的呢?
其实是 addChild() 方法把 Wrapper(这个 Wrapper 后面我们会看到是 StandardWrapper) 放进 StandardContext 里面去了,之后又做了一系列的处理,当时看了很多文章,都交代的很不清楚,我这边带师傅们过一遍。
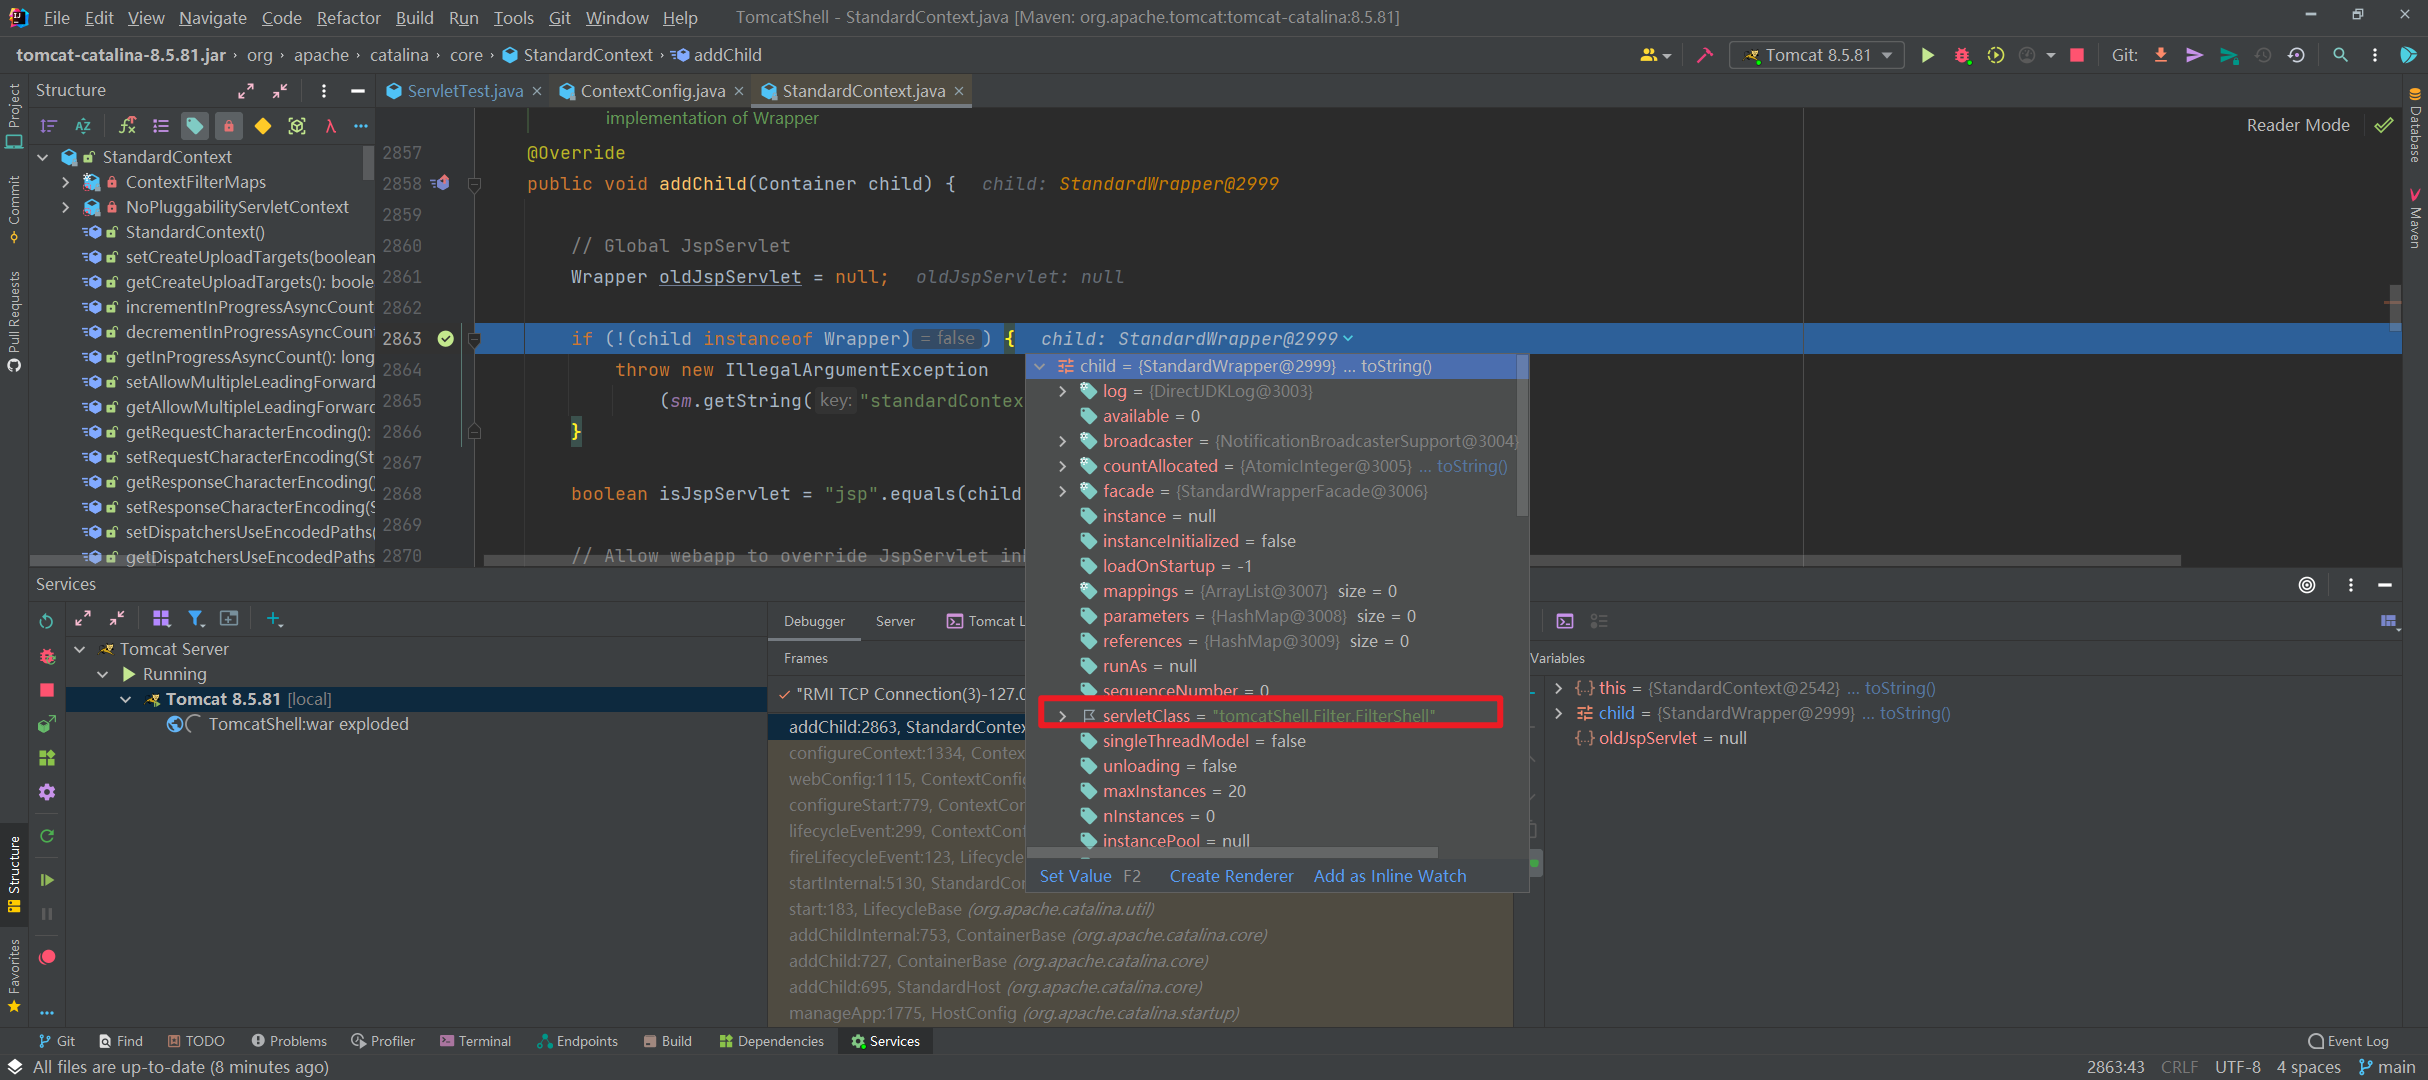
紧接上文,我们跟进 addChild() 方法,这时候去到的是 StandardContext 类的 addChild() 方法,它判断这个 Servlet 是否是 JSP 的 Servlet
运行到最后,是这个语句,这里如果环境有问题的师傅可以私聊一下我,我当时也是搭的环境有问题,导致一直在踩坑。
1 | super.addChild(child); |
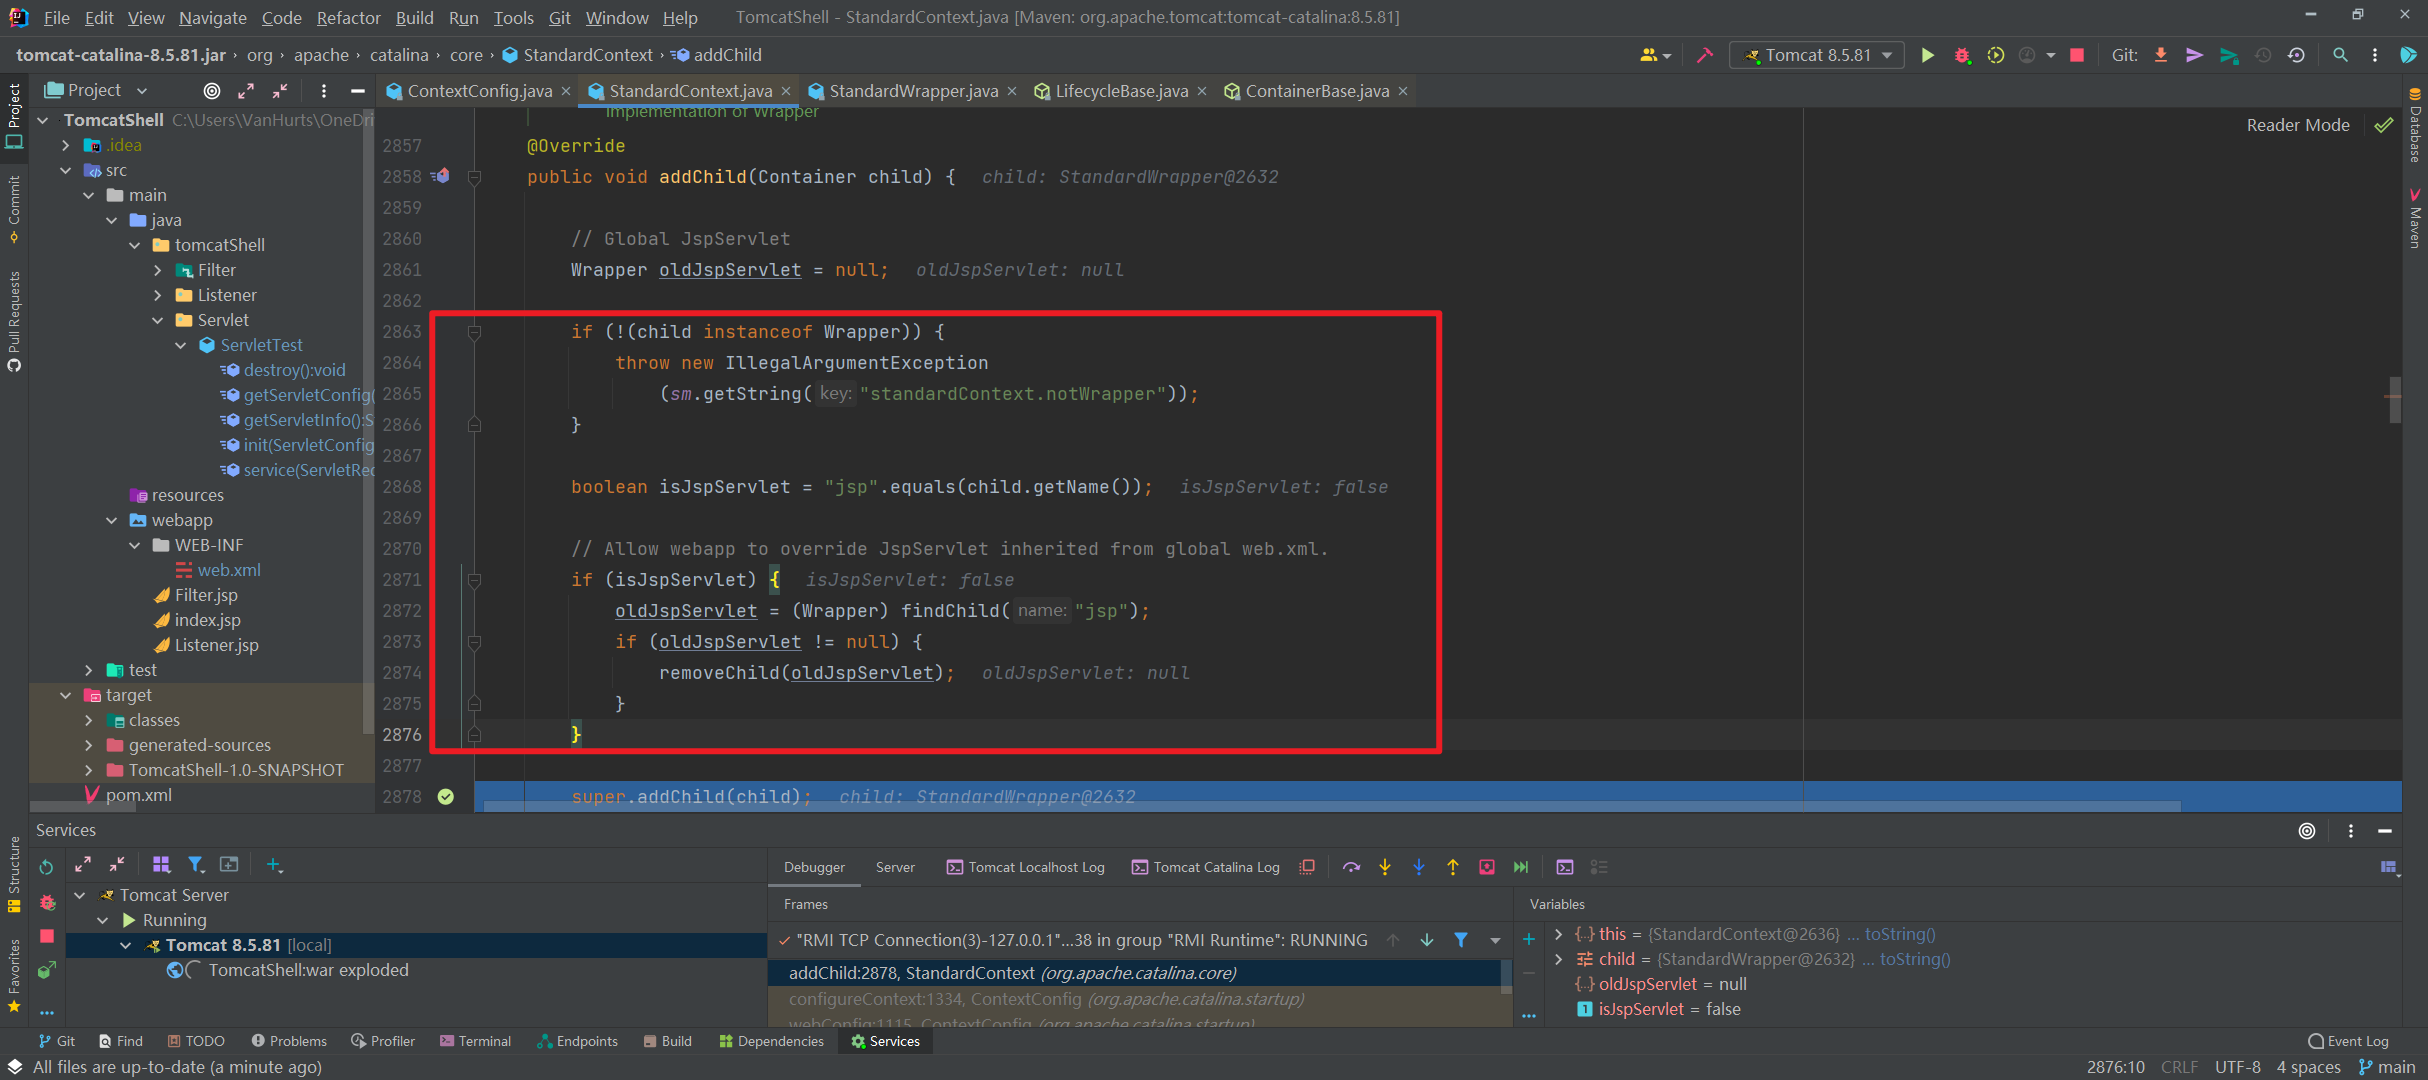
跟进去,发现是它的父类,ContainerBase,这是一个抽象类,当时我一度以为我分析错了,结果发现并不是错误。
ContainerBase 类的 addChild() 方法判断了是否开启全局安全这个配置。
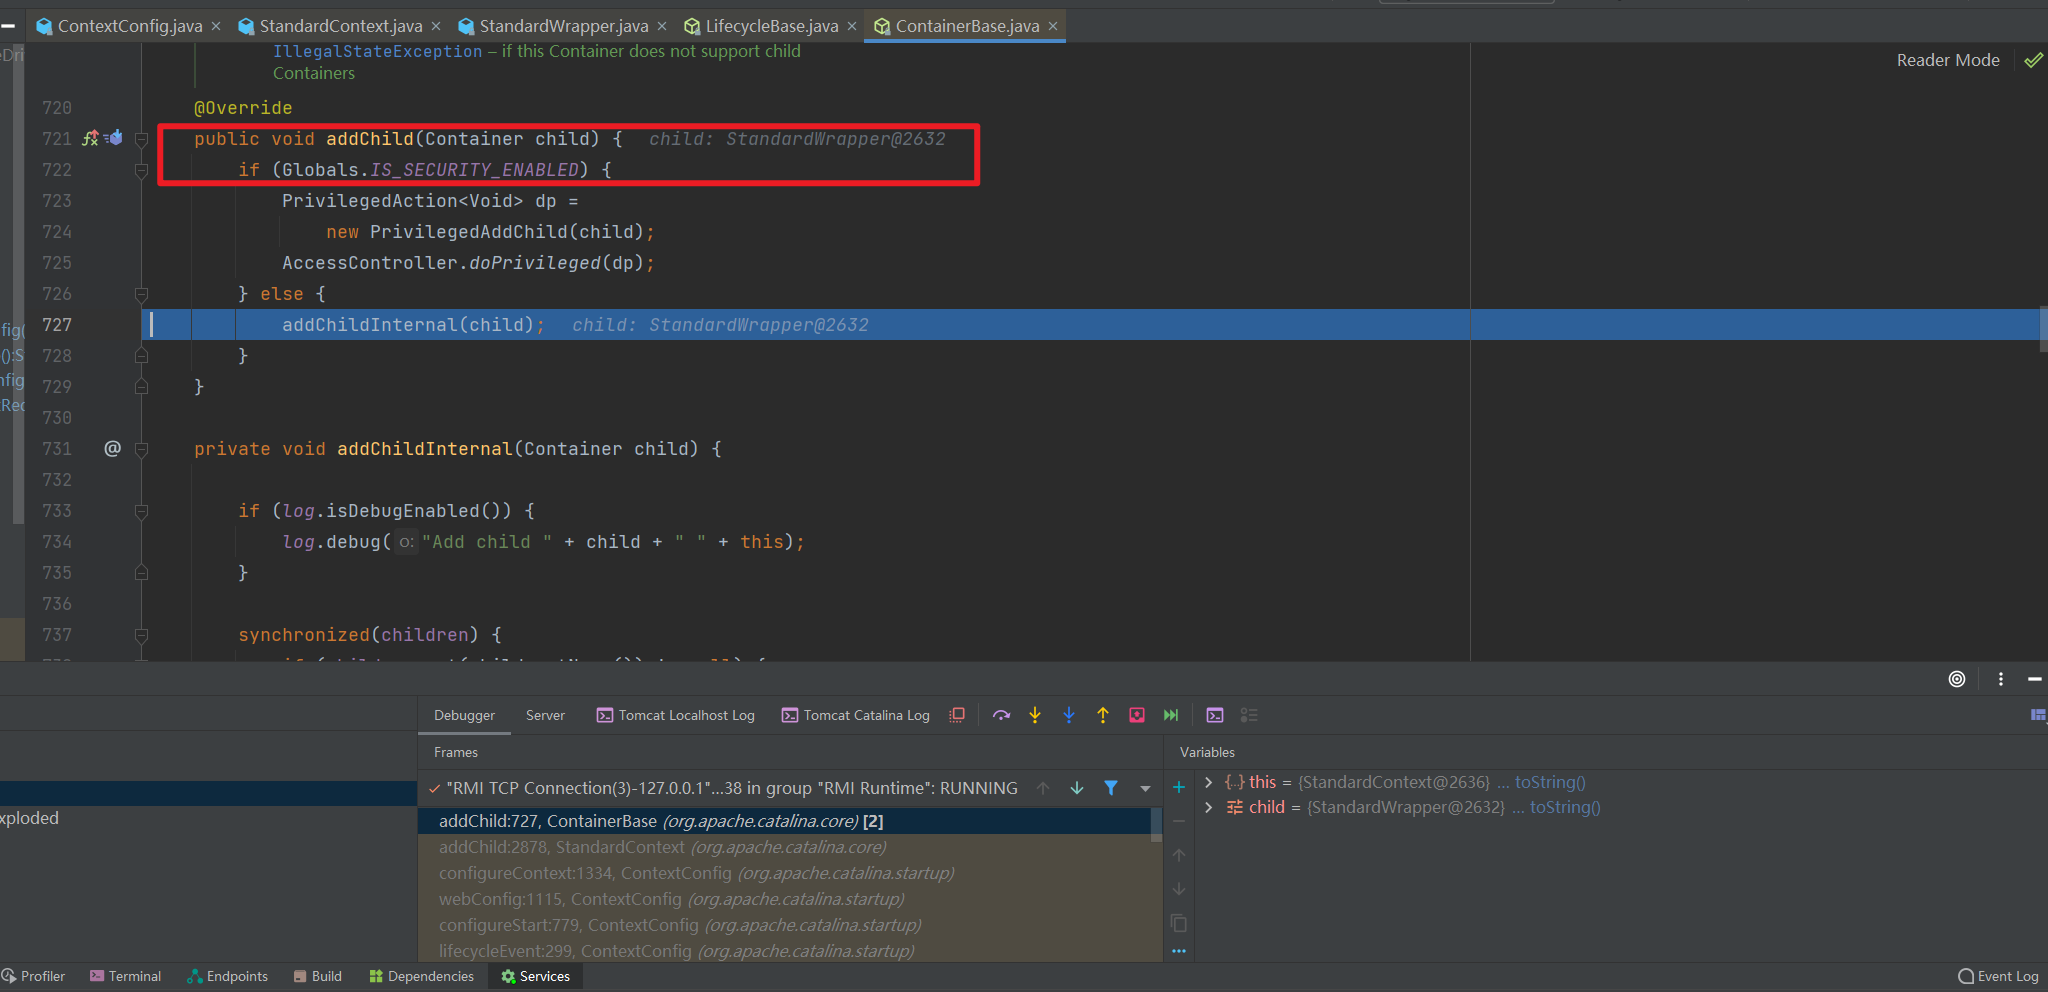
继续往下,跟进到 addChildInternal() 方法里面
它首先判断了 log,也就是日志功能是否开启,这些都是无足轻重的,主要是它在 753 行这里调用了这个语句
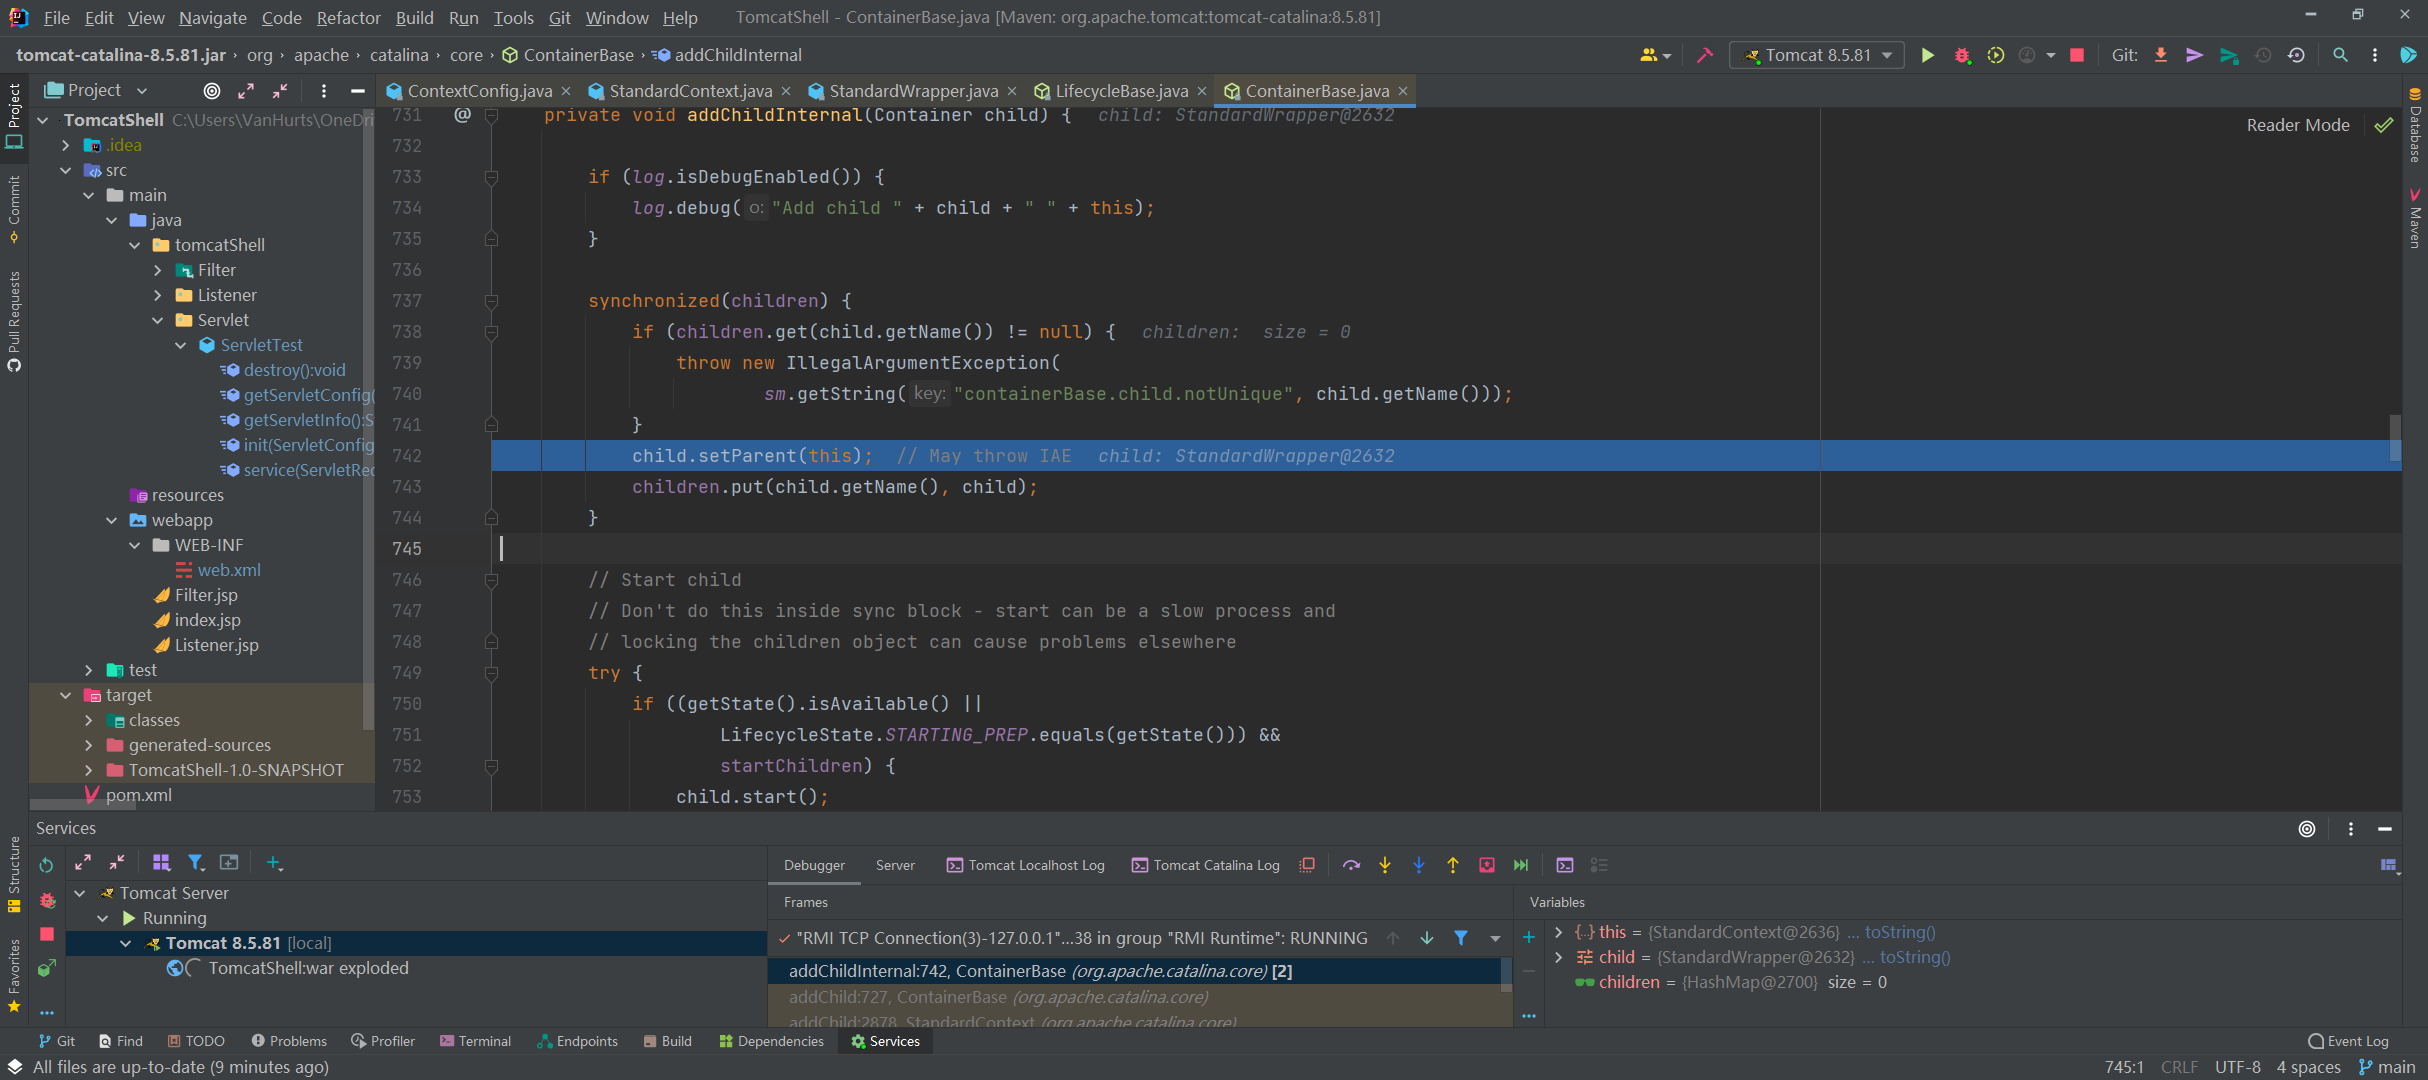
1 | child.start(); |
start 方法,就是启动一个线程,在我们 Servlet 里面,也就是开启此 Servlet 的线程,我们跟进去看 Servlet 的线程被启动之后做了什么事。
这里我们从 ContainerBase 类进入到了 LifecycleBase 类,
LifecycleBase 类的 start() 方法这里先是进行了一些基础的日志判断,后面肯定是会走到 init() 方法里面进去的,要不然刚开始 start 的一个 Servlet 直接就 stop,是不合理的。
init() 里面就是一些基础的赋值,我们这里就不看了,主要看后面的重点部分 ———— startInternal()
跟进去,这里我们就走到了 StandardContext#startInternal,如图
往下走,到 5130 行,调用了 fireLifecycleEvent(),它主要做了一个解析 web.xml 的工作。
f8 往下走,就会走到 ContextConfig#configureContext 方法这里
这里回来,又把 web.xml 的东西装了一遍,过程有点套娃,但是也可以理解。
- 总而言之,
addChild()方法把 servlet 放进了 children 里面,children 也就是 StandardWrapper,如图。
在 addChild() 方法之后,调用 addServletMappingDecoded() 方法添加映射关系。
将 url 路径和 servlet 类做映射。
总结一下,Servlet 的生成与动态添加依次进行了以下步骤
- 通过
context.createWapper()创建 Wapper 对象; - 设置 Servlet 的
LoadOnStartUp的值; - 设置 Servlet 的 Name ;
- 设置 Servlet 对应的 Class ;
- 将 Servlet 添加到 context 的 children 中;
- 将 url 路径和 servlet 类做映射。
加载 Servlets
- 上文我们的分析点是停在了
addChild(),以及addChild()之后的addServletMappingDecoded()映射。 - 这其实是因为我们当时在
StandardContext#startInternal中,进了fireLifecycleEvent()方法,又做了一遍 StandardWrapper 装载的工作。
所以这里我们重新回到 StandardContext#startInternal 中,从 fireLifecycleEvent() 方法往下走。
继续往下走,无非是一些赋值,都不怎么重要,重要的地方在这里:
跟进,进入到 loadOnStartup() 方法
我们会看到它对 loadOnStartUp 这个属性进行了判断
对于这个参数:
在 servlet 的配置当中,<load-on-startup>1</load-on-startup> 的含义是: 标记容器是否在启动的时候就加载这个 servlet。 当值为 0 或者大于 0 时,表示容器在应用启动时就加载这个 servlet; 当是一个负数时或者没有指定时,则指示容器在该 servlet 被选择时才加载。 正数的值越小,启动该 servlet 的优先级越高。
如果要在 web.xml 里面配置应该如此
1 | <load-on-startup>1</load-on-startup> |
这里对应的实际上就是 Tomcat Servlet 的懒加载机制。
很明显这里 web.xml 的内容肯定不是我们可控的,所以必须要把恶意的 Servlet 放到最前面去加载。这是我们的一种思路
如果不进行相关的操作,其实影响也不算大。
0x04 Servlet 内存马编写
上文分析了很长篇幅的 Servlet 工作流程,我们可以总结一下到底做了什么。
小结一下 Servlet 的工作流程
首先获取到 HTTP 请求,这里的处理比较简单,和之前 Filter 流程分析是一样的。
- 后面读取到 web.xml,并且在 WebConfig 方法里面还创建了一个 StandardWrapper,而我们的 Servlets 都会保存到这个 StandardWrapper 里面;
- 后续这个 Wrapper 是放到 Context 里面去的,这时候就应该祭出这句名言了:
“一个 Context 对应于一个 Web 应用,可以包含多个 Wrapper。”
“一个 Wrapper 对应一个 Servlet。负责管理 Servlet”
在创建与加载完 StandardWrapper 之后,我们肯定是需要把加载的 Servlets 从 StandardWrapper 里面读取出来,所以这里就到了我们最后的一个过程:加载 Servlets,对应有一个很重要的属性值 ———— loadOnStartUp
设想 Servlet 内存马的攻击
分析一下应该如何攻击;有这么几个关键点:
- StandardWrapper
- StandardContext
- 恶意 Servlet
这里我直接以流程图来演示吧,更为清晰一些。
- 获取
StandardContext对象 - 编写恶意 Servlet
- 通过
StandardContext.createWrapper()创建StandardWrapper对象 - 设置
StandardWrapper对象的loadOnStartup属性值 - 设置
StandardWrapper对象的ServletName属性值 - 设置
StandardWrapper对象的ServletClass属性值 - 将
StandardWrapper对象添加进StandardContext对象的children属性中 - 通过
StandardContext.addServletMappingDecoded()添加对应的路径映射
编写 Servlet 内存马的 PoC(.jsp)
获取 StandardContext 对象
StandardContext对象获取方式多种多样
1 | <% |
或
1 | <% |
编写恶意Servlet
1 | <%! |
创建Wrapper对象
1 | <% |
将 Wrapper 添加进 StandardContext
1 | <% |
完整POC
1 | <%@ page import="java.lang.reflect.Field" %> |
Servlet 型的内存马无法使所有请求都经过恶意代码,只有访问我们设定的 url 才能触发
Servlet 型内存马的缺点就是必须要访问对应的路径才能命令执行,易被发现。
先访问 Servlet.jsp,完成内存马的注册
再访问 servletshell;并带上 cmd 参数
编写 Servlet 内存马的 PoC(.java)
思想是类似的,师傅们可以自行复现;这里是需要在 web.xml 里面加上 servlet 的调用的。
1 | package tomcatShell.Servlet; |
0x05 小结
Servlet 型内存马相比于前几种的内存马,更容易被查杀出来,Filter 和 Listener 型内存马更改为简单粗暴,因为它们先于 Servlet 内存马之前插入。
0x06 参考资料
- 本文标题:Java内存马系列-05-Tomcat 之 Servlet 型内存马
- 创建时间:2022-09-04 15:17:21
- 本文链接:2022/09/04/Java内存马系列-05-Tomcat-之-Servlet-型内存马/
- 版权声明:本博客所有文章除特别声明外,均采用 BY-NC-SA 许可协议。转载请注明出处!